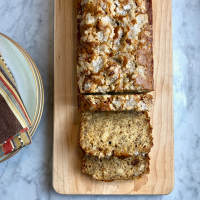
I am obsessed with my Pullman loaf pan- I just love the shape and the resulting presentation. 🙂 I have been using it for quick breads and had yet to use it with the lid. With the lid in place, the resulting bread has an almost square shape. It was crispy on the outside and tender on the inside, and, of course, pretty! This recipe was adapted from Martha Stewart’s Baking Handbook; I adapted the cooking times for a convection oven. We ate it with Greek Red Lentil Soup but had plenty of leftovers for sandwiches.
I’m bringing this beauty to share at Angie’s Fiesta Friday #58 over at the Novice Gardener- Enjoy!
Yield: One 12 or 13-inch loaf (depending on pan size)
- 1 1/2 pounds bread flour, plus more for dusting (about 4 1/2 cups)
- 3 1/2 tsp instant yeast
- 1 1/2 T coarse salt
- 1 1/2 T granulated sugar
- 1/3 cup nonfat dry milk
- 2 T unsalted butter, room temperature
- 1 3/4 cups warm water (about 110 degrees)
- vegetable oil or cooking spray for the bowl and pan
- In the bowl of an electric mixer fitted with the dough hook, combine the flour, yeast, salt, sugar, dry milk, and butter.
- Add the warm water, and beat on low-speed until the dough is smooth, elastic, and uniform in color, about 5 minutes.
- Turn out the dough onto a lightly floured work surface and finish kneading it by hand, about 5 times, making sure that all ingredients are fully incorporated and the dough forms a smooth ball.
- Place the dough in a lightly oiled bowl, cover with plastic wrap, and let rise in a warm place until doubled in bulk, about 1 hour. (I used a proofing drawer.)
- Punch down the dough. Pull the sides into the center. Invert the dough in the bowl, so that it rests smooth side up. Cover with plastic wrap, and let rise in a warm place (proofing drawer) until doubled in bulk, about 1 hour.
- Generously brush a 12 or 13-inch Pullman loaf pan with vegetable oil or spray with cooking spray, making sure to undercoat the underside of the lid, as well as the bottom and sides of the pan. Set aside.
- Turn out the dough onto a lightly floured surface. Roll or press out the dough into a 12-by-8-inch rectangle, with the long side facing you. Starting at the top, roll the dough toward you, gently pressing as you go to form a tight log. Pat the ends to make even. Gently roll the log back and forth to seal the final seam.
- Place the loaf, seam side down, in the prepared pan, and slide the lid three-quarters of the way closed. Let rise in a warm place (proofing drawer) until the dough is almost touching the lid, 45 to 60 minutes. (I let mine rise a little bit too long because the dough rose to touch the lid…)

- Meanwhile, preheat the oven to 425 degrees (convection).
- Close the lid completely and bake, rotating the pan halfway through, until the loaf is light golden brown (open the lid to check), about 30 minutes (on convection) to 45 minutes in a standard oven. Reduce the temperature to 350 degrees, re-close the lid, and continue baking another 25 to 30 minutes.
- Transfer pan to a wire rack to cool for 10 minutes. (The bread should have a hollow sound when tapped on the bottom. If not, continue baking, covered, checking at 5-minute intervals, until the crust is deep golden brown.)
- Remove bread from pan, and let cool completely before slicing. The bread can be wrapped in plastic and kept at room temperature for up to 4 days.
One Year Ago:
Two Years Ago:





This looks delish! What a beautiful loaf!!
Thank you so much- We have been enjoying it over many meals… Had a fried egg with pesto & greens on some this morning!!
What a beautiful looking loaf, and I like the look of the tin as well. I keep meaning to make bread more often as we get through quite a bit in our house. I’m not sure they would look as pretty as this, though! Thanks for sharing with Fiesta Friday.
Thank you so much, Caroline. Thanks for co-hosting this week & Happy FF to you! 🙂
Pingback: Fiesta Friday #58 | The Novice Gardener
I love baking breads myself and bake a big loaf every weekend.. this is a stunning loaf ! and.. may i say i love that Tin.. i have been looking for good tin myself.. where did u get such a tin ?
Thank you so much! I bought it on Amazon 🙂 It is 13x4x4-inches. I LOVE it!!
Thanks for letting me know.. i am definitely eyeing on buying one 🙂
beautiful perfect loaf.
Thank you so much, Namrata!
wow looks lie a bakery loaf – amazing, no wonder you love that pan
Thank you so much for your amazing compliment! 🙂 The pan takes the credit for sure!
oh my dear brook cook – not at all it’s a bad work-woman that credits her pans – I know I could have a pan like that and NEVER would one of my loaves look remotely like yours, trust me, never! So congratulations to you, you wonderful baker!
🙂 ❤ Josette
I think my grandma had long slender pans like that but I have never seen one with a lid. This may be a silly question but does baking the bread with the lid on make the bread different in some way?
Yes! It keeps the top from becoming round- the resulting loaf was an almost perfect rectangle! I don’t use the top to make quick breads, I just love the shape. It shortens the baking time too.
This looks awesome, I love the shape the lid gives it!
Thank you so much! 🙂
Gorgeous! What a beautiful loaf! 😍
Thank you so much 🙂
Impressive loaf of bread, Josette! Great…now I want (rather, need) another kitchen tool! I think I can see why you’re obsessed with the pan.
You NEED one for sure! 😉 Looking forward to your Pullman pan creations!
What is the temperature if you are not using a convection oven?
The temperature is the same- the baking time will just be longer in a standard oven.
Pingback: Honey-Oat Pain de Mie - #BreadBakers | Hostess At Heart
This bread has 3, 1-hour rises??
Yes! The third rise may be less than 1 hour- I would check it after 45 minutes or so.
In the instructions #10 states: “Reduce the temperature to 350 degrees, re-close the lid…” but I don’t see where you are to open it. Am I missing something, or is this just an oops?
It should be re-closed after checking to see if the loaf is a light golden brown. I’ll make the instructions more clear- thank you!
What if you don’t have the lid? How long do you bake and at what temperature?
I am not sure but I would think that the temperature and baking time would be approximately the same. The shape will be different- and the top may brown more.
Would it hurt the loaf to add a little more butter to it??
I’m not sure but it sounds like a delicious plan! 🙂