Damson Plum & Cream Tart

This is the second dessert I was able to make with the bounty of Damson plums I received in my CSA share. The plum compote was a great way to preserve the plums for a later use; it keeps for up to two weeks in the refrigerator.

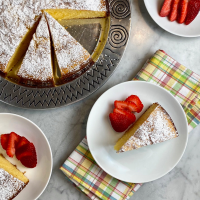
The sweet compote paired very nicely with the lightly sweetened cream filling and crust. The quantity of compote used to garnish the top of the tart can be adjusted to affect the overall sweetness of the finished tart.

This recipe was adapted from Gourmet, via Epicurious.com. The pastry recipe is from Martha Stewart. Store-bought pie crust could easily be substituted. I have been eating the leftover compote drizzled over vanilla ice cream!

Yield: One 10-inch tart, Serves 6 to 8

For the Pastry:

  • 2 1/2 cups all-purpose flour
  • 1 tablespoon sugar
  • 1 tsp coarse salt
  • 2 sticks plus 2 tablespoons cold unsalted butter, cut into small pieces
  • 1/4 to 1/2 cup ice water

For the Compote:

  • 1 pound Damson plums or prune plums
  • 1 3/4 cups sugar
  • pinch of coarse salt
  • 2 tablespoons white wine or citrus juice
  • 1 Turkish or 1/2 California bay leaf

For the Cream Filling:

  • 1 cup heavy cream
  • 1/2 vanilla bean, split lengthwise
  • 1 tablespoon granulated sugar
  • 1/2 teaspoon grated lemon zest

  1. Make pastry dough: Pulse flour, sugar, and 1 teaspoon salt in a food processor until combined.
  2. Add butter, and pulse until mixture resembles coarse meal, about 10 seconds.
  3. Drizzle 1/4 cup ice water evenly over mixture. Pulse until mixture holds together when pressed between 2 fingers (dough should not be wet or sticky). If dough is too dry, add more water, 1 tablespoon at a time, and pulse.
  4. Shape dough into 1 large disk, and wrap in plastic wrap. Refrigerate until firm, at least 1 hour. (Dough can be refrigerated overnight or frozen for up to 3 months. Let chilled dough stand for 10 minutes and frozen dough thaw before using.)
  5. Make the compote while pastry chills: Bring whole plums, sugar, salt, wine/citrus juice, and bay leaf to a simmer in a heavy medium saucepan over medium-low heat, covered, stirring occasionally until sugar has dissolved (be careful juices don’t boil over). (I used an enameled cast iron saucepan.)
  6. Reduce heat to low and simmer, covered, stirring occasionally, until plums fall apart, about 30 minutes.
  7. Transfer to a bowl and chill, uncovered, until cold, then cover.
  8. Discard pits and bay leaf, then add a little confectioners sugar to taste if desired.
  9. Prepare the pastry: Between layers of plastic wrap, roll dough into an approximately 12-inch round, enough to cover a 10-inch tart pan bottom and sides.
  10. Prick bottoms all over with a fork, then freeze tart pan on a cookie sheet until firm, at least 1 hour.
  11. Preheat oven to 425°F with rack in middle, preferably on convection.
  12. Place chilled tart crust in oven. Turn oven temperature down to 400°F and bake until golden all over, 11 to 13 minutes.
  13. Transfer tart pan to a rack to cool completely, then remove shell from pan.
  14. Make the cream filling: Put cream in a large bowl, then scrape seeds from vanilla bean into cream.
  15. Beat in sugar and zest with an electric mixer until cream just holds stiff peaks.
  16. Fold in about 2 tablespoons plum compote, then spread cream in the prepared tart shell.
  17. Serve topped with some of remaining compote (you will have a lot left over).

Note: Compote keeps, covered and chilled, 2 weeks.

One Year Ago:

Two Years Ago:

Three Years Ago:

White Peach-Vanilla Bean Jam with Cinnamon

IMG_4960

“This jam tastes like PIE” I said. “It smells like a FARM STAND” my son said. Everyone else was too busy eating it to comment. 🙂

I had this recipe in my mind on our way to pick peaches. We went right for the white peach trees because they are my FAVORITE. The peaches were fabulous and ripe, practically falling off of the trees. This jam is terrific too. A great way to save the great summer flavor of a fresh peach. This recipe was adapted from the book Food in Jars via First Look Then Cook.

The first time I ever made jam it was with a friend and her family. I picked up a lot of tips to ease the process from that experience. When chopping the peaches and adding the multiple cups of sugar, I always keep track of how many cups I’ve added into the pot, one at a time. I don’t use a canner– I heat the jars in my pressure cooker (minus the lid) with the insert in place on the bottom of the pot as well as in my pasta pot with the strainer in place as well. Both inserts separate the glass jars from touching the bottom of the pot on high heat. The classic canning method is described below. I must admit that I don’t always process the jars in hot water after filling them with jam. After boiling the jars, I seal them using the “old school” method- inverting the jars for 5 minutes after filling them. After turning them right side up the seal needs to be checked carefully as the jam cools to make sure that this method has worked; the button on the lid must stay depressed. It’s been foolproof for me!

  • 10 cups of peaches, peeled and chopped (approximately 13 to 14 large peaches)
  • 6 cups of sugar
  • 2 teaspoons cinnamon
  • 1 vanilla bean, split
  • 2 lemons, zested and juiced
  • 2 packets (1 box) liquid pectin (I used Certo) (Update: PERFECT consistency using Ball  brand)
  1. Peel the peaches: Bring a pot of water to a boil. Set a bowl of ice water next to the pot. Wash the peaches well. Lightly score the bottom of each peach with an “x”. Using a bamboo strainer or slotted spoon, lower 4-5 peaches into the boiling water. Cook for 45  to 60 seconds. Remove the peaches with the strainer or slotted spoon and place into the ice water for 10 seconds. The skin should slide right off. Repeat as necessary.
  2. Remove the peach pits and coarsely chop. Place in a food processor, about 5 peaches at a time, and pulse to chop but not puree. Repeat as necessary.
  3. Fill your canning pot with water and begin to bring it to temperature. Wash your jars and rings in warm soapy water and set aside. Put your lids in a small pot of water and heat (but do not boil) in order to soften the sealing compound. (After washing, I put my jars in water, let it come to a boil, and then let them sit until ready to cool, drain, and prepare the jam.)
  4. Add peaches and sugar to a large, non-reactive pot. (Count carefully!) Stir so that the peaches begin to release their juice and mingle with the sugar. Bring to a boil and add cinnamon, seeds from the vanilla bean, vanilla bean pod, lemon zest and juice and let jam continue to cook for about fifteen minutes. If the fruit hasn’t broken down much after that time is up, use a potato masher (taking care not to burn yourself with hot jam) to break down the chunks.
  5. Remove the vanilla bean pod and then add pectin. Bring to a rolling boil for a full five minutes. (Check consistency- mine was still a little runny after 5 minutes and needed more time.)
  6. Turn off the heat under the jam and fill jars. Wipe rims and apply lids. Screw on the bands and lower into the water. Process in the hot water bath 10 minutes. When time is up, remove from water and cool on the counter. (The alternate “old school” option is to invert the jars for 5 minutes.) When the jars are cooled, check the seal by pressing on the top of the jar. If there’s no movement, the jar has sealed. Store up to one year in a cool, dark place.

Makes 6-7 pints (yield varies depending on width of pot, cooking length and juiciness of fruit).

IMG_4820

Strawberry-Vanilla Bean Jam

IMG_1225

The first time I went strawberry picking on the North Fork in Long Island, I went to a friend’s house to make jam with her family. We made simple, perfect strawberry jam. I have made this jam for years. (so unlike me!) So, this year I looked around to try something new, initially to try a pectin-free jam. While perusing recipes, I found this one from a cookbook called Food in Jars, via First Look, Then Cook. It had me at vanilla bean. 🙂 The strawberries macerate in sugar and vanilla beans for a minimum of 2-3 hours and up to a maximum of 72 hours (of course I had to do 72 hours to maximize the vanilla flavor). The result was pretty fabulous! Next year I will have to pick even more strawberries to make this and another new kind of jam! SO GOOD!

Makes 8 8-ounce jars IMG_4000

  • 12 cups of ripe, chopped strawberries
  • 2-3 vanilla beans, split and scraped (I used 2)
  • 6 cups of sugar, divided
  • 2 lemons, zested and juiced
  • 4 tablespoons powdered pectin (I use Sure-Jell)
  1. Wash and prepare/sterilize jars and lids. (To be safe, I prepare 9 jars.)
  2. Wash and chop berries. Toss them with 1 cup of sugar and the vanilla beans/seeds and place in a large jar or bowl.  Allow the berries to macerate for at least 2-3 hours and up to 72 hours. IMG_3906
  3. When you’re ready to make the jam, prepare jars (this recipe makes 5 pints).  Pour macerated strawberries into a large, non-reactive pot and add the remaining cups of sugar, lemon juice and zest and stir to combine.  Bring to a boil (this jam will foam madly, beware).  Cook jam over high heat, stirring regularly for 20-25 minutes, until it takes on a thick, syrupy consistency.
  4. Remove the vanilla beans. Add the pectin and bring to a rolling boil.  Let the jam boil vigorously for an additional three to four minutes.
  5. Remove jam from the stove, and ladle into your prepared jars. (I use a canning funnel and the mess is minimal.)
  6. Wipe rims, apply lids and rings. Process in your canner for 10 minutes (You should start your timer until the water has returned to a boil- however, as long as your water is quite hot when the jars go into the canner, the time it will take to return to boiling should be minimal.) (To cheat, the jars filled with hot jam can be inverted after the lids have been placed. After 5 minutes, place them right side up. The jars are sealed when the center button in the lid pops.)
  7. When time is up, remove jars from canner and let them cool on a towel-lined counter top.
  8. When jars are cool enough to handle, remove rings and check seals.  If any jars are not sealed, store them in the fridge and use them first.  Store sealed jars in a cool, dark place. IMG_3945

Slow-Cooker Pear and Apple Butter

Apple and Pear Butter

We love apple butter or fig butter (from Trader Joe’s!) on our cinnamon-raisin “British” muffins in the morning – with butter too, of course. This Pear and Apple Butter has a deep, delicious flavor – much more complex than store-bought. It was fabulous on our “British” muffins and on whole wheat toast. I keep every salsa and mustard jar (all jars…) and reuse them for everything under the sun – storage for pantry items, my kids collections, etc. I also used these jars to give this fruit butter as gifts. (Well-received!) This recipe is from Everyday Food.

  • Yield: Makes 6 cups
  • 2 1/2 pounds Bartlett or Anjou pears (about 5)
  • 2 1/2 pounds McIntosh or Gala apples (about 5)
  • 1 cup packed dark-brown sugar
  • 1/2 teaspoon coarse salt
  • 1 cinnamon stick
  1. Peel, quarter, and core pears and apples. In a food processor, finely grate fruit (in batches if necessary), then transfer to a 5- to 6-quart slow cooker. Stir in dark-brown sugar, salt, and cinnamon stick. Cover and cook on high, 4 hours.
  2. Remove cinnamon stick and reserve. Transfer mixture to processor (in batches if necessary) and process until smooth. Return to slow cooker, along with cinnamon stick, and cook on high, uncovered, until mixture is thick and browned, 4 hours. Discard cinnamon stick and let mixture cool. Transfer to airtight containers and refrigerate, up to 3 weeks, or freeze, up to 3 months.
 

Classic Applesauce

Every autumn I used to make a roasted applesauce.  I liked it because it was different.  My husband says that I am the only one who liked it…. so, I made this classic applesauce instead.  I will admit that everyone loved it!

The recipe was adapted from Martha Stewart’s Everyday Food.

Yield: about 4 cups

  • 4 to 5 pounds apples such as McIntosh, Gala, Empire, and/or Braeburn
  • freshly squeezed juice from 1 lemon (Meyer lemon juice also works well)
  • 1 1/2 cups water
  • large pinch coarse salt, or more, to taste
  • 1/2 tsp ground cinnamon, plus more for sprinkling, if desired
  1. Peel, core, and slice the apples. Place in a large pot or Dutch oven.
  2. Bring the sliced apples, lemon juice, and water to a boil over high.
  3. Reduce heat and simmer until apples are very soft and falling apart, 25-30+ minutes.
  4. Mash with a potato masher or pulse in a food processor until smooth with small chunks remaining.
  5. Add salt and cinnamon. Taste and adjust seasoning, if necessary.
  6. Let cool, then transfer applesauce to airtight containers.  (I use recycled jars.)
  7. Refrigerate, up to 5 days, or freeze, up to 2 months. Serve sprinkled with cinnamon, if desired.

Enter your email address to follow this blog and receive notifications of new posts by email.

Join 1,459 other subscribers

Recipe Categories

my foodgawker gallery
my photos on tastespotting

Top Posts & Pages

Mexican Sweet Corn Cake (Pan de Elote)
Vietnamese-American Garlic Noodles
Banana Bread with Crunchy Sugar Topping
One-Pan Orzo with Spinach & Feta
Churro Cupcakes with Cinnamon Cream Cheese Frosting
One-Pot Crispy Gnocchi with Burst Tomatoes & Fresh Mozzarella
One-Pan Shrimp Scampi with Orzo
Samin Nosrat's Buttermilk-Brined Roast Chicken
Italian Sausage & Mushroom Ragu with Pappardelle
Ravneet Gill's Perfect Chocolate Chip Cookies
Foodista Food Blog of the Day Badge