Kale & Spinach Spanakopita Pie

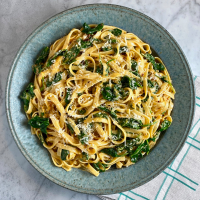
This savory pie gobbled up all of the kale from my CSA box. Kale is more appetizing to my crowd when it’s paired with lots of salty cheese. 🙂 We ate it as a main course with sliced heirloom tomatoes and green salad on the side. It would be wonderful served for brunch or a special lunch too.

This recipe was adapted from The Washington Post, contributed by G. Daniela Galarza. I modified the method and incorporated my CSA purple kale and Toscano kale along with baby spinach. Swiss chard and/or collard greens could also be used in the filling.

The original recipe notes that sheep’s milk feta is traditional in spanakopita but any salty, crumbly or grated cheese such as cojita, chevre, extra-sharp white cheddar, paneer or pecorino would also work. The pie can also be made without the crust as a gluten-free option. Healthy and delicious.

Yield: Serves 4 to 6

  • 2 tablespoons olive oil, plus more for brushing
  • 1 bunch (about 4 ounces) scallions, white and green parts, thinly sliced
  • 8 to 10 cups (about 10 ounces) baby spinach (whole) and/or other greens (I used stemmed purple and Toscano kale, sliced into 1/4-inch ribbons)
  • 1/2 teaspoon kosher salt
  • 8 ounces phyllo dough, about half a box, defrosted
  • 1 bunch (about 1 heaping cup leaves) fresh dill or parsley leaves, chopped
  • 1/2 cup plain breadcrumbs
  • 6 ounces feta, crumbled
  • 1/8 teaspoon freshly ground black pepper
  • 3 large eggs, whisked well
  1. In a large skillet over medium-high heat, heat 2 tablespoons of olive oil until shimmering. (I used a 14-inch stainless skillet.)
  2. Add the scallions and cook, stirring occasionally, until they start to brown, about 1 minute.
  3. Add the spinach/greens and salt, and cook until the greens wilt, release their liquid, and dry out, about 5 minutes.
  4. Scrape the mixture into a large bowl and let it cool while you prep the other ingredients and prepare the crust.
  5. Position a rack in the middle of the oven and preheat to 400 degrees. (I set my oven to true convection.)
  6. Brush a 9-inch pie plate with olive oil or coat with cooking spray. (I used a ceramic deep dish pie plate.)
  7. Crumble the feta in a medium bowl. Add the breadcrumbs, black pepper, and chopped herbs. Set aside.
  8. Whisk the eggs in a separate bowl. Set aside.
  9. Unravel the phyllo dough onto a clean, dry work surface. (I cover the stack with damp paper towels, topped with plastic wrap to prevent the dough from drying out.)
  10. Working quickly, gently brush the top sheet of phyllo with some olive oil. There’s no need to oil every spot; the oil will spread as you work. Pick up the first three or four sheets of phyllo in a stack and lay them, oil side up, in the pan, allowing one narrow end to cover the bottom of the pan and the other end to climb up the side of the pie plate and hang over the edge. (I layered the sheets one by one but would group them next time!)
  11. Repeat, brushing the top of the remaining stack of phyllo sheets, and placing the next three or four sheets into the pan, oil side up. Continue oiling and fitting the oiled phyllo into the pie plate, rotating the pan so that the bottom is covered and a roughly even amount of phyllo is hanging over the circumference of the pie plate. This will not look perfect; if the phyllo tears, patch it and keep going. Set the pie plate aside.
  12. Add the chopped herbs, breadcrumbs, feta and black pepper to the cooled spinach, stirring to combine.
  13. Add the eggs, mixing well to combine.
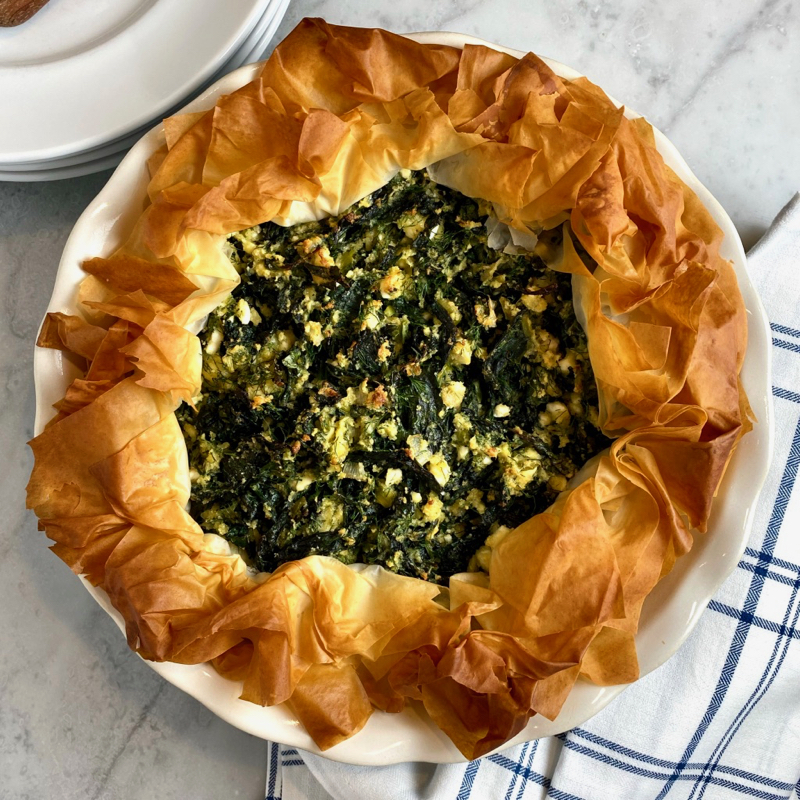
  14. Pour the filling into the phyllo-lined pie plate and, using your fingers, crinkle the phyllo overhang partially over the top of the pie, leaving a 5- to 6-inch diameter in the center exposed. The more crinkled the top is, the nicer it will look once baked, so don’t worry about making this look neat.
  15. Lightly oil any dry spots of phyllo before baking, if needed.
  16. Bake for 22 to 35 minutes, or until the filling is set and the phyllo is deep brown in places, like the color of an almond skin. Serve hot or at room temperature.

Note: The filling can be made one day in advance.

Skillet Phyllo Pie with Butternut Squash, Kale, & Feta

This is another “healthyish” cast iron skillet recipe from Bon Appétit. It was almost my entire CSA box in a pie. 🙂 I incorporated CSA leeks, butternut squash, and Toscano kale. Very seasonal- perfect.

I had an abundance of kale, so I made the pie in a large (12-inch) skillet. I also incorporated kohlrabi greens. Because this recipe is very adaptable, the finished pie size can be modified depending upon the volume of filling. Any other greens would work too.

The recipe was adapted from Bon Appétit, contributed by Anna Jones. The lemon zest was essential. We had a green salad made with my CSA romaine lettuce on the side. 🙂

Yield: 6 servings

  • 3 tablespoons olive oil, plus more for brushing
  • 2 large leeks, white and light green portions, cut into 1/4-inch half-moons and soaked OR 2 medium red onions, finely chopped
  • 1/2 small butternut squash (about 1 to 1 1/2 pounds), peeled, cut into 3/4-inch pieces
  • 1 1/2 teaspoons fresh thyme
  • 1/2 teaspoon crushed red pepper flakes
  • 1 bunch Tuscan kale, ribs and stems removed, thinly sliced into 1/4-inch crosswise ribbons (I used about 8 cups) 
  • 2 to 3 large eggs, beaten to blend (I used 3 eggs for a 12-inch pie)
  • 3 ounces Parmesan, grated (I used Parmigiano-Reggiano)
  • 1 teaspoon finely grated lemon zest (I used the zest of one lemon)
  • Kosher salt and freshly ground black pepper
  • 8 ounces frozen phyllo pastry, thawed (half a 1-pound package)
  • 4 to 6 ounces fresh goat cheese or feta, crumbled, divided
  1. Place a rack in lower third of oven; preheat to 400°, preferably on convection.
  2. Heat 3 tablespoons of oil in a large ovenproof skillet over medium. Add leeks or onions and cook, stirring occasionally, until softened but not browned, 6–8 minutes.
  3. Add squash and cook, stirring occasionally, until almost tender, 8–10 minutes.
  4. Mix in thyme and red pepper flakes and transfer to a large bowl; let cool.
  5. Wipe out and reserve skillet.
  6. Add kale, eggs, Parmesan, and lemon zest to squash mixture and gently mix to combine; season with salt and pepper.
  7. If using 6 ounces of cheese, incorporate 2 ounces into the kale-squash mixture.
  8. Working quickly so that the phyllo doesn’t dry out, layer phyllo sheets inside reserved skillet, letting 2-3 inches hang over the edge. (I placed them in a circular fashion. I also brushed some oil between every few layers.)
  9. Spoon kale-and-squash mixture into phyllo and dot top with cheese.
  10. Brush edges of phyllo lightly with oil and fold over filling, overlapping slightly, leaving center exposed.
  11. Cook pie over low to medium-low heat until bottom of pastry is just golden (carefully lift up on one side with a heatproof rubber spatula so that you can take a peek), about 3 minutes.
  12. Transfer skillet to oven and bake pie until kale is wilted and tender and phyllo is golden brown and crisp, 20–25 minutes.
  13. Let pie cool in skillet at least 10 to 15 minutes before slicing into wedges.

Do Ahead: Pie can be baked 6 hours ahead. Let cool; store uncovered at room temperature.

Swiss Chard & Ricotta Galette

I kept waiting for Swiss chard to appear in my CSA box so that I could make this savory galette. 🙂

This recipe was adapted from Martha Stewart. We ate it for dinner but it would be perfect for a special lunch or brunch. It was a surprisingly hearty meal served with a green salad. (I will confess that I served it with leftover pizza to please the rest of my crowd.) 🙂

The crust was particularly amazing. It is made with rolled oats and cream cheese which resulted in wonderful texture.

Yield: One 10 to 11-inch tart

For the Crust:

  • 1 cup unbleached all-purpose flour
  • 1/2 cup old-fashioned rolled oats
  • 1 teaspoon kosher salt
  • 1 stick (1/2 cup) cold unsalted butter, cut into small pieces
  • 3 ounces cream cheese
  • 1 large egg yolk

For the Filling & Egg Wash:

  • 2 tablespoons extra-virgin olive oil
  • 12 ounces Swiss chard, leaves sliced in half through the center rib, stems separated and sliced into 1/4-inch pieces
  • 1 large onion, sliced lengthwise 1/4 inch thick
  • Kosher salt and freshly ground pepper
  • 3 tablespoons balsamic vinegar
  • 2 tablespoons golden raisins
  • 3 anchovy fillets, coarsely chopped (optional)
  • 2 tablespoons fresh thyme leaves
  • 6 ounces ricotta, room temperature
  • 1/4 cup finely grated Parmigiano-Reggiano
  • 3 tablespoons heavy cream, divided
  • 1/2 teaspoon freshly grated nutmeg
  • 1 large egg yolk

To Make the Crust:

  1. Pulse flour, oats, and salt in a food processor to combine.
  2. Add butter, cream cheese, and egg yolk; pulse until dough just holds together, 15 to 20 seconds.
  3. Turn dough out onto a piece of plastic wrap and flatten into a disk; wrap in plastic. Refrigerate at least 1 hour or overnight.

To Make the Filling:

  1. In a large skillet, heat 1 tablespoon oil over medium. Add chard stems, onion, and a pinch of salt. Cook, stirring, until stems are soft and slightly brown, 8 to 10 minutes.
  2. Add vinegar and cook, stirring, until liquid is almost evaporated, about 2 minutes.
  3. Season with salt and pepper. Stir in raisins. Transfer mixture to a nonreactive bowl.
  4. Heat remaining 1 tablespoon oil in same skillet over medium-high. Add anchovies, if using; cook, stirring frequently, 1 minute. Stir in thyme. (I incorporated the anchovies.)
  5. Add chard leaves and cook until slightly wilted, about 1 minute. Season with salt and pepper.
  6. In the bowl of a mixer fitted with the paddle attachment, beat both cheeses with 2 tablespoons cream until smooth, about 1 minute.
  7. Stir in nutmeg; season with salt and pepper.

To Make the Galette:

  1. Preheat oven to 375 degrees, preferably on convection.
  2. On a large sheet of parchment, roll out dough to a 1/8-inch-thick round, about 13 to 14-inches in diameter.
  3. Arrange onion mixture evenly over dough, leaving a 3-inch border.
  4. Spread ricotta mixture over onion mixture; top with chard mixture.
  5. Fold edges of dough over and gently press down to seal.
  6. Transfer tart (still on parchment) to a baking sheet. Refrigerate 15 minutes.
  7. In a small bowl, beat together egg yolk and remaining 1 tablespoon cream. Brush exposed dough with egg wash.
  8. Bake until crust is golden, 40 to 45 minutes. Serve warm or at room temperature.

Tomato-Lemon Tart

Lucky me- I recently received several beautiful homegrown tomatoes from friends. 🙂 This quick and easy tart was a great way to showcase them.

The recipe was adapted from Bon Appétit. I modified the method and proportions and added parmesan in lieu of creme fraiche. The punch of lemon surprised my son but I thought that it added bright and fresh flavor.

We ate this tart for dinner with a green salad. It would also be lovely served as an appetizer. A dollop of ricotta cheese may also be nice, so I included it as an option for next time.

Yield: 4 servings

  • 1 sheet frozen puff pastry (one 14-ounce package or half of a 17.3-ounce package), thawed
  • all-purpose flour, for dusting
  • 2 garlic clove, finely grated
  • 2 tablespoons olive oil, divided, plus more for serving
  • 1/2 lemon, thinly sliced into 1/8-inch rounds on a mandoline, seeds removed (5-6 slices)
  • 1/2 to 1 cup basil leaves, to taste, divided
  • 1 pound ripe tomatoes (about 3 medium), sliced 1/4 inch thick
  • Kosher salt and freshly ground pepper
  • 1/4 cup freshly grated Parmesan Reggiano cheese
  • ricotta cheese, for serving, optional
  1. Preheat oven to 375°, preferably on convection.
  2. Place tomato slices on a paper towel-lined cutting board. Season with salt and pepper.
  3. Roll out puff pastry on a sheet of lightly floured parchment paper, smoothing out creases, to a large rectangle measuring about 10×14 inches.
  4. Prick pastry in a few places with a fork, leaving a 1″ border around the edges, then slide parchment paper onto a rimmed baking sheet.
  5. Combine grated garlic and 1 tablespoon of oil in a small bowl and brush dough with garlic oil, staying within border.
  6. Arrange 5 to 6 lemon slices over the brushed pastry, then scatter 8 basil leaves over lemon slices.
  7. Pat the tomatoes dry with additional paper towels. Arrange tomatoes on top of the pastry (a little overlap is okay). Drizzle with 1 tablespoon of oil.
  8. Bake tart until edges of pastry are browned, puffed, and crisp, about 30–35 minutes.
  9. Remove from the oven and top with grated parmesan and basil (chiffonade).
  10. Let tart cool 10 minutes before cutting into 8 pieces. Serve with a dollop of ricotta cheese, if desired.

Caramelized Zucchini Phyllo Pie with Corn & Herbs

This phyllo-crusted savory pie is packed with caramelized summer zucchini. It is a wonderful way to gobble up an abundance of fresh squash from the garden or your CSA share. 🙂 I loved that it was baked in a cast iron skillet too.

The recipe was adapted from thekitchn.com, contributed by Grace Elkus. We ate it for dinner with a green salad but it could also be served for a special brunch or lunch- an amazing summer meal.

Yield: Serves 6

  • 6 phyllo sheets from a 1-pound package of frozen phyllo dough (13×18-inch), thawed in the refrigerator overnight
  • 1 1/2 pounds zucchini (about 3 medium)
  • 2 medium-large shallots
  • 5 tablespoons olive oil, divided
  • 2 teaspoons kosher salt, divided
  • 1/2 teaspoon freshly ground black pepper, divided
  • 1 tablespoon water
  • 2 large eggs
  • 1/4 cup tightly-packed coarsely chopped fresh basil leaves, plus whole leaves for garnish
  • 3 tablespoons coarsely chopped fresh dill
  • 1 1/2 ounces Parmesan cheese (1 scant cup freshly grated)
  • 1 1/2 cups fresh or frozen corn kernels (from about 2 ears fresh)
  • 3 ounces feta cheese (about 1/3 cup crumbled)
  • hot sauce, for serving (optional)
  1. Thaw 1 (1-pound) package phyllo dough overnight in the refrigerator, if needed (if there are two interior packages, just thaw one). Unroll and stack 6 of the phyllo sheets on a large baking sheet. Cover with plastic wrap, wax paper, or a damp kitchen towel and leave at room temperature. Reroll the remaining phyllo sheets, place in a gallon-size zip-top freezer bag, and refreeze for another use. (I covered it with a damp paper towel topped with plastic wrap.)
  2. Trim the ends off 1 1/2 pounds zucchini. Slice each in half crosswise, then halve lengthwise. Slice lengthwise into thin planks. Place in a large bowl.
  3. Halve and thinly slice 2 shallots. Add to the bowl with the zucchini.
  4. Heat 3 tablespoons of the olive oil in a 10-inch cast iron or straight-sided ovensafe skillet over medium-high heat until shimmering. Add the zucchini and shallots (reserve the bowl), season with 1 1/2 teaspoons of the kosher salt and 1/4 teaspoon of the black pepper, and toss to coat in the oil as best you can (the pan will be very full).
  5. Cook, stirring occasionally, until the squash and shallots are slightly caramelized and beginning to stick to the pan, 12 to 15 minutes.
  6. Reduce the heat to medium, add 1 tablespoon water, and continue to cook 5 minutes more, scraping up the flavorful stuck-on bits as you go.
  7. While the squash cooks, arrange a rack in the lower third of the oven and heat the oven to 400°F, preferably on convection.
  8. Whisk 2 large eggs in a large bowl.
  9. Prep and add the following to the eggs in the bowl: Coarsely chop fresh basil leaves until you have 1/4 tightly-packed cup. Coarsely chop fresh dill until you have 3 tablespoons. Finely grate Parmesan cheese until you have 1 scant cup, if needed. If using fresh corn, remove the husks and cut the kernels from the cobs (about 1 1/2 cups). Crumble in 3 ounces feta cheese. Season with the remaining 1/2 teaspoon kosher salt and 1/4 teaspoon black pepper.
  10. When the squash is ready, add it to the bowl and stir to combine.
  11. Pour the remaining 2 tablespoons olive oil into a small bowl, for brushing. Wipe the skillet clean and brush with a thin layer of the oil.
  12. Working quickly to prevent the phyllo from dying out, transfer 2 phyllo sheets to the skillet, overlapping them to completely cover the bottom and sides of the pan, folding any overhang into the pan. (Keep the remaining phyllo covered). Brush lightly with olive oil.
  13. Place a third phyllo sheet in the skillet so that half is hanging over the rim. Repeat with the remaining 3 sheets, arranging them so they completely cover the rim of the skillet.
  14. Spread the zucchini mixture into the skillet in an even layer.
  15. Fold and crimp the overhanging phyllo toward the center, leaving the center 4 inches exposed.
  16. Gently brush any remaining oil over the phyllo.
  17. Bake until the phyllo is golden brown and crispy and the center is slightly puffed and set, 24 to 30 minutes.
  18. Let sit 10 minutes before slicing.
  19. Top with torn fresh basil leaves. Serve with hot sauce, if desired.

Storage: Leftovers can be stored in an airtight container in the refrigerator for up to 3 days.

Ina Garten’s Caramelized Onion, Tomato & Goat Cheese Tarts

One of my friends frequently serves these tarts when entertaining with rave reviews. She describes them as “flavor bombs!” 🙂 I loved them so much, I have also served them on more than one occasion myself.

The tarts can be formed into rectangles on sheet pans, or into rounds on pizza tins. Square pieces are perfect appetizer portions. As they are a bit time consuming to prepare, the tarts can be assembled a day prior to baking and serving. To limit the amount of moisture on the crust, it is important to not to incorporate too many tomatoes.

The recipe was adapted from Barefoot Contessa Back to Basics, via Food Network.com, contributed by Ina Garten. I doubled the recipe, modified the proportions, and made large tarts rather than individual tarts.

Yield: Two 12-inch tarts

  • 1 package (17.3 ounces/2 sheets) puff pastry, defrosted
  • extra virgin olive oil
  • 8 cups thinly sliced yellow onions (about 3 large onions)
  • 6 large garlic cloves, cut into thin slivers
  • Kosher salt and freshly ground black pepper
  • 6 tablespoons dry white wine
  • 4 teaspoons minced fresh thyme leaves
  • 1/2 cup freshly grated Parmesan, plus more for garnish
  • 6 to 8 ounces garlic-and-herb goat cheese (I used Trader Joe’s herb-goat cheese)
  • 1 pound Campari or small “on-the-vine” tomatoes (about 3 per tart), or 2 large tomatoes, cut into 8 (1/4-inch-thick) slices
  • 6 tablespoons julienned basil leaves, divided
  1. Unfold a sheet of puff pastry on a lightly floured surface and roll it lightly to an 12 by 12-inch square. Fold the corners in to form a circle. Repeat with the second pastry sheet. (Alternatively, the pastry can be kept in a rectangle, lightly rolled until smooth.)
  2. Place the pastry circles on 2 pizza pans lined with parchment paper and refrigerate until ready to use. (If using rectangles, place the pastry on 2 rimmed sheet pans lined with parchment paper.)
  3. Preheat the oven to 425 degrees F, preferably on convection.
  4. Heat 3 tablespoons of olive oil in a large skillet over medium to low heat and add the onions and garlic. Saute for 15 to 20 minutes, stirring frequently, until the onions are limp and there is almost no moisture remaining in the skillet.
  5. Add 1 teaspoon salt, 1/2 teaspoon pepper, the wine, and thyme and continue to cook for another 10 minutes, until the onions are lightly browned. Remove from the heat.
  6. Using a sharp paring knife, score a 1/4-inch-wide border around each pastry.
  7. Prick the pastry inside the score lines with the tines of a fork and sprinkle 4 tablespoons of grated Parmesan on each round, staying inside the scored border.
  8. Place 1/2 of the onion mixture on each tart, again staying within the scored edge.
  9. On each tart, crumble 3 to 4 ounces of goat cheese on top of the onions.
  10. Place tomato slices over each tart. Brush the tomatoes lightly with olive oil and sprinkle each with 2 T basil, salt, and pepper.
  11. Finally, scatter 4 or 5 shards of Parmesan on each tart.
  12. Bake for 25 minutes on convection, or until the pastry is golden brown. The bottom pan may need an extra few minutes in the oven.
  13. After removing from the oven, garnish each tart with the remaining tablespoon of basil and more grated Parmesan.
  14. Serve hot or warm.

Pear and Almond Tart

I served this elegant tart on Thanksgiving Eve this year. It was very well received! The classic combination of pears and almonds was absolutely delicious.

This recipe was adapted from Dolester Miles’ recipe in Frank Stitt’s Southern Table: Recipes and Traditions from Highlands Bar and Grill, via The Washington Post. The restaurant is located in Birmingham, Alabama. I used poaching liquid instead of rum in the filling and reduced the baking time. Wonderful!

Yield: 8 servings

For the Crust:

  • 1 cup plus 3 T flour, plus more for the work surface
  • 1/8 teaspoon kosher salt
  • 6 tablespoons (3/4 stick) cold, unsalted butter, cut into cubes
  • 1 large egg, lightly beaten

For the Pears:

  • 3 cups granulated sugar
  • 6 cups water
  • half a vanilla bean, split
  • one 3-inch cinnamon stick
  • 5 (large) to 6 almost-ripe, firm pears, such as Bartlett, Anjou or Bosc, peeled, halved lengthwise and cored

For the Filling:

  • 8 T (1 stick) unsalted butter, at room temperature
  • 1/4 cup sugar
  • 1 large egg
  • 1 cup finely ground blanched almonds
  • 1 tablespoon all-purpose flour
  • 3 T Calvados, dark rum, or poaching liquid
  • 1 teaspoon pure almond extract
  • 1/4 cup blanched/slivered or sliced almonds, toasted, for garnish

To Make the Crust:

  1. Use cooking oil spray to grease a 10-inch tart pan with a removable bottom.
  2. Place the flour in a food processor.
  3. Sprinkle the salt and cubes of butter into the flour. Pulse until the butter is pea-sized.
  4. Pour the egg over the mixture; pulse just until the dough begins to come together.
  5. Turn the dough out onto the counter, and then gather it into a disk.
  6. Cover with plastic wrap and refrigerate for at least an hour, or up to 1 day.
  7. Lightly flour a work surface. Unwrap and roll the dough out into a 12-inch round. (I roll the dough out between 2 sheets of plastic wrap.)
  8. Transfer it to the tart pan, using your fingertips to line the pan with the dough. Trim the edges even with the rim of the pan.
  9. Cover with plastic wrap and refrigerate until you are ready to bake.

To Poach the Pears:

  1. Combine the sugar, water, vanilla bean and cinnamon stick in a medium saucepan. Bring to a boil over medium-high heat, stirring to dissolve the sugar. Reduce the heat to medium and cook for 15 minutes.
  2. Add the pears; once the liquid begins to bubble at the edges, cook the pears for 15 to 20 minutes, until they are tender and the tip of a paring knife slips into them easily. Let them cool in their liquid. Discard the cinnamon stick and vanilla bean.

To Make the Filling and Finish the Tart:

  1. When ready to assemble, make the filling: Preheat the oven to 425 degrees, preferably on convection.
  2. Toast the almonds in a small, dry skillet over medium-low heat for several minutes, until fragrant and lightly browned, shaking the pan occasionally to avoid scorching. Cool completely before using for the topping.
  3. Combine the butter and sugar in the bowl of a stand mixer or handheld electric mixer; beat on medium speed for several minutes, until light and fluffy.
  4. Reduce the speed to low; add the egg, ground almonds, flour, Calvados, rum, or poaching liquid and the almond extract. Beat for about 2 minutes, until smooth.
  5. Remove the tart shell from the refrigerator. Unwrap and pour in the filling, spreading it evenly.
  6. Remove the pears from the poaching liquid, placing them in a colander set over a bowl. Reserve 1 cup of the poaching liquid for this recipe; reserve and refrigerate the rest for poaching more fruit later.
  7. Place the pears cut sides down on the tart filling, side by side with the narrow ends facing in, until the entire surface of the tart is covered with pears. Cover the edge of the tart to prevent over-browning and bake (middle rack) for about 28 to 30 minutes, until golden brown.
  8. Meanwhile, cook the reserved cup of poaching liquid in a small saucepan over high heat until it has reduced to a glaze – about 2 to 3 tablespoons total. Remove from the heat.
  9. Once the tart comes out of the oven, brush it with the glaze, then scatter the toasted almonds evenly over the top. Serve warm, or at room temperature.

Note: The dough needs to be refrigerated for at least 1 hour and up to 1 day. The pears can be stored in their cooking liquid in the refrigerator for up to 3 days. The poaching liquid can be reused.

Enter your email address to follow this blog and receive notifications of new posts by email.

Join 1,459 other subscribers

Recipe Categories

my foodgawker gallery
my photos on tastespotting

Top Posts & Pages

Mexican Sweet Corn Cake (Pan de Elote)
Vietnamese-American Garlic Noodles
Banana Bread with Crunchy Sugar Topping
Italian Sausage & Mushroom Ragu with Pappardelle
Fettuccine Alfredo with Chili Crisp & Spinach
Chez Panisse's Blueberry Cobbler
Churro Cupcakes with Cinnamon Cream Cheese Frosting
Ethiopian Chickpea Stew (Shiro Wat) & Stewed Collard Greens (Gomen Wat)
Ina Garten's Vanilla Bean Brioche Bread Pudding
One-Pan Orzo with Spinach & Feta
Foodista Food Blog of the Day Badge