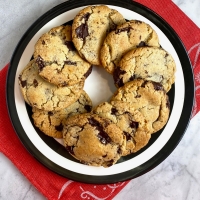
I am happy to report that my backyard rosemary survived the winter! The inclusion of rosemary drew me to this recipe. I must say that the rosemary and the oats made this soda bread uniquely delicious. I also loved the sheen from the egg white on top.
The recipe was adapted from Bon Appétit, contributed by Tori Ritchie. I modified the method and proportions. It was very tender and flavorful- perfect topped with salted butter. 🙂
Yield: Makes one 6-inch loaf
2 T unsalted butter
210 g (1 3/4 cups) all-purpose flour
1/4 cup old-fashioned oats
1/2 T granulated sugar
1/2 T chopped fresh rosemary
1 tsp baking powder
1/2 tsp baking soda
1/2 tsp Kosher salt
1/4 tsp freshly ground black pepper
3/4 cup plus 2 T buttermilk
1 egg white, beaten to blend
salted butter and/or preserves, for serving, as desired
Position rack in center of oven and preheat to 375°F, preferably on convection. Line a rimmed baking sheet with parchment paper.
Stir butter in heavy small saucepan over medium heat until melted and golden brown, about 3 minutes. Remove from heat.
Whisk flour, oats, sugar, rosemary, baking powder, baking soda, salt, and pepper in large bowl to blend.
Pour buttermilk and melted browned butter over flour mixture; stir with fork until flour mixture is moistened.
Turn dough out onto floured work surface; sprinkle the top with flour. (I used a silpat.)
Knead gently just until the dough comes together. (You’ll get the most tender soda bread by kneading the dough gently and briefly, so the gluten is minimally developed.)
Shape into a ball; flatten into a 6-inch round.
Place round on the prepared baking sheet.
Brush the top with beaten egg white.
Using the dough scraper or a small sharp knife, cut 1/2-inch-deep X in top of the dough round.
Bake until deep golden brown and a toothpick inserted into center comes out clean, about 30 minutes on convection or up to 45 minutes in a standard oven.
Cool on rack for at least 20 minutes. Serve warm or at room temperature.
Every Mardi Gras, I have made the same King Cake for as long as I can remember. It was a big deal for me to try a new version!
I was drawn to this recipe because I liked the idea of adding texture with the caramel crunch layer- and my family loves cream cheese frosting. It was delicious. The frosting was definitely a winner, but next time I would omit the caramel crunch- the cake didn’t need the extra sweetness. I still included it as an option in the recipe below.
The recipe was adapted from Food and Wine, adapted from The Good Book of Southern Bakingby Kelly Fields with Kate Heddings. I weighed the ingredients and modified the method. I used a cake pan but may opt for a cake ring or springform pan next time so that it would be easier to transfer the cake to a rack to decorate.
I decorated the cake with the traditional Mardi Gras sanding sugars. The recipe notes that the green, purple, and gold sugars represent faith, justice, and power, respectively, a nod to the “three kings.” Instead of placing a plastic baby inside, our family tradition is to place chocolate inside (a few dark chocolate chips this year). The person who receives the special slice with chocolate will have a lot of luck this year. 🙂
Yield: One 10-inch cake
For the Cake:
300 g (2 1/2 cups) bread flour
80 g (2/3 cup) all-purpose flour
2 tsp instant yeast
2 eggs, at room temperature
1 cup whole milk
28 g (2 T) lard (28g) (you can use vegetable shortening or butter, but it won’t be as delicious)
67 g (1/3 cup; 5 T) granulated sugar
1 tsp kosher salt (Morton’s)
5 T unsalted butter, cut into 5 pieces, at room temperature
For the Cinnamon Filling:
67 g (1/3 cup) granulated sugar
52 g (1/4 cup) firmly packed light brown sugar
1 T ground cinnamon
4 T unsalted butter, at room temperature
1/4 to 1/2 tsp Kosher salt
1 tsp pure vanilla extract
For the Caramel Crunch:
100 g (1/2 cup) granulated sugar
1/2 tsp light corn syrup
1/4 cup water
For the Cream Cheese Frosting & To Decorate:
4 oz cream cheese, at room temperature
511 g (4 1/2 cups) Confectioners’ sugar, sifted
4 to 8 T whole milk or heavy cream (I used 6 T cream plus 1 T milk)
1/4 tsp vanilla bean paste or vanilla extract
purple, green, and yellow sanding sugars, optional
To Make the Cake:
In a large bowl, whisk together bread flour, all-purpose flour, and yeast.
In the bowl of a stand mixer or in a large bowl using a handheld mixer, whisk eggs until smooth.
Switch to dough hook or a large wooden spoon, and add milk, lard, and flour mixture. Mix on low speed until a dough starts to form, 3 to 4 minutes.
Stop mixer and scrape down sides of bowl with a spatula. With mixer on low speed, add sugar and salt, then increase speed to medium, and mix for 3 minutes.
Decrease speed to low and add butter, one tablespoon at a time, until fully incorporated.
Increase speed to medium-high and beat dough for 5 to 7 minutes, until butter is fully incorporated and the dough is silky and shiny.
Coat a large baking sheet with cooking spray.
Transfer dough to baking sheet and press it with heel of your hand to about 3/4-inch thick and as close to a 6- by 10-inch rectangle as possible (it’s fine if it’s a little wider or longer).
Cover baking sheet in plastic wrap and refrigerate overnight (about 12 hours). Dough can also be frozen, but will need to thaw overnight in the refrigerator before using.
Make the cinnamon filling, directions below; set aside.
Lightly coat a 10-inch-round cake ring or springform pan or cake pan with 2-inch-high sides (I used a fluted 10.5-inch pan with 2-inch sides) with cooking spray. (A cake ring or springform pan may be a better choice because it was difficult to maintain the shape when transferring out of the baking pan and onto the cooling rack.)
Cut the cold dough into two 3-by-10-inch strips.
On a pastry mat sprinkled with flour, use a lightly floured rolling pin to roll each piece evenly to approximately 6 by 12 inches, maintaining a rectangular shape.
Sprinkle half of cinnamon filling into a thin, almost transparent layer on each strip of dough, making sure to leave a 1-inch border on the long bottom edge.
Using a pastry brush, brush the bottom border of each piece of the dough with water until slightly wet; this will act as a sealant later.
Starting at top edge, roll up dough like a cinnamon roll. (You want the edge you left bare to end up at the outside of the roll.) Once rolled, lightly press down to evenly seal dough; the water will help to fully seal.
Using your hands, continue to roll log to double its length, about 22 inches. Make sure to keep width of the log consistent. Follow the same process for second strip of dough.
Place a few chocolate chips (or a bean, Hershey’s kiss, or plastic baby) randomly inside one of the rolls.
Twist together dough logs in a spiral. Once fully twisted, connect ends together to form a ring shape; pinch to seal if needed.
Place dough in prepared pan and cover loosely with plastic wrap.
Let dough proof at room temperature (ideally about 75°F) or in a proofing oven for about (check after 1 hour next time) 1 1/2 to 2 hours, until it has risen to about 1 1/2 times its original size and slightly springs back after you press it. (If it does not spring back at all, it has over-proofed and should be discarded.)
Preheat oven to 350°F, preferably on convection.
Before baking, spritz dough with water (or lightly sprinkle water over dough with your hands) to help prevent crust from hardening.
Bake for 20 min on convection or 30 to 35 minutes in a standard oven, rotating the pan after 10 minutes on convection or 15 minutes in a standard oven, until golden brown.
Let cake cool in pan for 5 to 10 minutes, then carefully remove king cake from pan and transfer it to wire rack placed inside a parchment paper-lined baking sheet. (My cake flattened a bit from inverting it after 5 minutes- maybe better to wait 10 minutes before removing or just use a springform pan next time.)
Let cool completely, about 1 hour.
To Make the Cinnamon Filling:
Using a fork, mix granulated sugar, brown sugar, cinnamon, butter, salt, and vanilla until a uniform mixture forms. Set aside.
Filling can be used right away or stored in an airtight container in the refrigerator for up to 3 days and brought to room temperature before using.
To Make the Caramel Crunch (optional):
In a small non-reactive pot, combine sugar, corn syrup, and water.
Bring to a boil over high heat, making sure sugar fully dissolves. *Do not stir* the mixture — stirring will cause sugar to crystalize. Alternatively, swirl the mixture by moving the pot.
Continue cooking just until mixture becomes a medium amber color, intermittently swirling the pot, for about 4 to 5 minutes.
Remove from heat and ladle caramel over cake, creating a thin, even coating over entire cake.
Allow crunch to set for 15 to 20 minutes before icing cake.
To Make the Cream Cheese Frosting & To Finish the Cake:
In the bowl of a stand mixer fitted with the paddle attachment or in a large bowl using a handheld mixer, mix cream cheese on medium speed until very smooth.
Reduce speed to low and add powdered sugar in 3 portions, mixing well after each addition, until a smooth paste forms.
Stop mixer and scrape down sides of bowl.
With mixer on low speed, slowly stream in 4 T cream or milk and mix until frosting is well combined and smooth. Add more milk or cream until desired consistency is achieved. (I used 6 T cream plus 1 T milk.)
Mix in vanilla bean paste.
This frosting can be stored in an airtight container in refrigerator up to 4 days. Bring to room temperature before using.
While cake is still cooling on the wire rack, spread the frosting over cake. (I used a 2 T scoop to evenly distribute the icing over the top of the cake and then spread it with an offset spatula.)
If you’re sticking true to Mardi Gras tradition, sprinkle sanding sugar over top and allow cake to sit for at least 30 minutes before transferring it to a serving plate.
Note: You can keep the King Cake in an airtight container at room temperature for up to 3 days, but it truly is best on the day it is made. (I kept leftovers in the refrigerator because of the cream cheese frosting.)
This is another wonderful peach recipe. The goal was to create coffee-shop/bakery muffins that were “tall, craggy, rich, and bronzed.” Success.
The recipe is from Deb Perelman’s book, Smitten Kitchen Keepers: New Classics for Your Forever Files. She recommends storing the leftover muffins in the pan- uncovered. I did this with some skepticism but will report that (as promised) the peaches kept the muffins moist and the room air kept the topping from becoming soggy.
The original recipe notes that other stone fruit can be substituted for the peaches. Ground cardamom (1/2 tsp) can also be incorporated, if desired.
Yield: 12 muffins
3 medium-large (1 to 1 1/2 pounds or 455 to 680 grams, total) ripe or very ripe yellow peaches
8 T (1/2 cup, 4 oz, or 115 grams) unsalted butter, melted
3/4 cup (150 grams) granulated sugar
1 tsp (3 grams) plus a pinch, kosher salt (I used Diamond Crystal), divided
2 1/4 cups (295 grams) all-purpose flour, divided
1 cup (230 grams) plain or vanilla yogurt
2 large or extra-large eggs
2 tsp baking powder
1/2 tsp baking soda
1/2 tsp ground cinnamon
1/2 tsp ground ginger
Heat the oven to 375 degrees F (190 C), preferably on convection.
Line 12 standard muffin cups with paper liners, or coat with nonstick spray.
Halve, pit, and thinly slice the peaches. Set 24 to 36 peache slices aside for decoration.
Chop the remaining peach slices into small pieces. You need 1 1/2 cups.
Mix the butter, sugar, a pinch of salt, and half of the flour (1 cup plus 2 T, or 145 grams) in a large bowl until it forms a clumpy mixture.
Remove 6 semi-packed tablespoons (about 115 grams) and set it aside; this will be the streusel topping.
Add the yogurt and eggs to the big bowl of crumbs; whisk to combine. (It’s okay if it is not smooth.)
Add the baking powder, baking soda, cinnamon, ginger, and remaining 1 tsp salt; whisk well.
Stir in the remaining flour and chopped peaches just until the flour disappears.
Using a cookie scoop or spoon, divide the batter among the prepared muffin cups. (They will be filled nearly to the top.)
Arrange 2 or 3 fanned slices of peach on top of each.
Divide the reserved streusel topping over the muffins. Nudge any that spills off back onto the cups of batter.
Bake for 20 to 22 minutes, or until a toothpick inserted under the peach slices comes out batter-free. (I baked mine for 22 minutes on convection.)
Let the muffins rest in the baking tin for 5 minutes before removing. Serve warm or at room temperature.
Note: Leftover muffins keep for 2 days at room temperature. Keep them in the baking pan but uncovered.
This beautiful breakfast pastry uses store-bought puff pastry as a shortcut. I loved the crushed dried blueberries sprinkled over the top.
I served this pastry as part of our Easter brunch along with my favorite brunch dish, Asparagus, Leek and Gruyere Quiche. We also had fruit and green salads, cheeses with crackers and warm bread, hummus with vegetables, nuts, and sliced kielbasa.
This recipe was adapted from Food and Wine, contributed by Anna Theoktisto. I modified the method and proportions. The combination of blueberries and lemon was bright and delicious.
The pastry is ideally served warm, but I made it a day in advance, refrigerated it overnight, and served it at room temperature. Still great. It could also be reheated prior to serving.
Yield: Two 5×12-inch Pastries (about 8 to 10 servings)
1 (18.3-ounce) package frozen puff pastry, thawed (I used Trader Joe’s)
all-purpose flour, for dusting
5.2 ounces cream cheese (such as Philadelphia), at room temperature
1 tablespoon plus 1 tsp freshly squeezed Meyer lemon juice
5 to 6 T blueberry preserves (I used Stonewall Kitchen)
scant 3/4 teaspoon cornstarch
1 large egg
1 T water
2 T whole milk
2 T whole freeze-dried blueberries, crushed
Line two large rimmed baking sheets with parchment paper.
Beat cream cheese, powdered sugar, and lemon zest and juice with an electric mixer fitted with the paddle attachment on low speed, gradually increasing mixer speed to medium-high, until mixture is smooth, about 2 minutes, stopping to scrape down sides of bowl as needed.
Measure 1/3 cup cream cheese mixture into a separate medium bowl; set aside for icing.
Unroll thawed puff pastry on a lightly floured work surface. (I used a pastry mat instead.) Cut pastry in half lengthwise; place 1 pastry half on prepared baking sheet. Repeat with second roll of pastry on second baking sheet.
Divide remaining cream cheese mixture in half. Spoon one ration of the mixture in a 1 1/2-inch-wide strip lengthwise down the middle of each pastry half on the prepared baking sheets, leaving a 1-inch border along short pastry edges.
Stir together preserves and cornstarch in a small bowl. Divide the mixture into fourths.
Spoon each ration of the preserves mixture evenly along the long edges of both cream cheese strips (about 1 1/2 tablespoons per side), leaving a 1-inch border on each long side.
Beat together egg and 1 tablespoon water in a small bowl. Brush border of topped pastry lightly with egg mixture; reserve remaining egg mixture.
Place remaining pastry half on top of filled pastry, pressing edges firmly to seal.
Chill until firm, about 20 to 30 minutes. Meanwhile, preheat oven to 350°F. (I set my oven to true convection.)
Brush chilled pastry lightly with reserved egg mixture. Using a paring knife, cut 5 small (about 1-inch) slits on top of pastry.
Bake in preheated oven until golden brown and evenly puffed, 40 minutes on convection or up to 45 minutes in a standard oven, rotating the pans halfway through the baking time.
Transfer baking sheet to a wire rack; let pastry cool 10 minutes.
Place freeze-dried blueberries in a zip-top bag and crush with a rolling pin.
Whisk milk into reserved 1/3 cup cream cheese mixture until smooth.
Drizzle icing over warm pastries, and sprinkle with crushed freeze-dried blueberries. Serve warm. (see Note)
Note: I waited for the pastries to cool to room temperature prior to drizzling with the icing. Once garnished, I wrapped them in plastic wrap and refrigerated them overnight. Pastry can be reheated or served at room temperature. It will keep in the refrigerator for up to one week.
I was planning to make banana bread but then told my husband about this cake. He did not hesitate before casting his vote. 😉 It was incredibly moist and delicious- and easy to make. I loved the crumb layer inside the cake.
This recipe was adapted from cookiesandcups.com. I weighed the ingredients, used unsalted butter, incorporated whole wheat pastry flour and cinnamon, omitted the glaze, and modified the baking time for a convection oven. We ate it for breakfast and dessert!
Yield: one 9×13-inch cake
For the Cake:
120 g (1 cup) all-purpose flour
120 g (1 cup) whole wheat pastry flour
3 tsp baking powder
1 tsp Morton kosher salt
1/2 tsp ground cinnamon
3 ripe medium-sized bananas, mashed
8 T (1 stick, 1/2 cup) unsalted butter, room temperature
400 g (2 cups) granulated sugar
2 large eggs
1 tsp pure vanilla extract
1 cup milk (I used 2%)
For the Crumb Filling & Crumb Topping:
16 T (2 sticks, 1 cup) cold unsalted butter, cubed
432 g (2 cups) light brown sugar
120 g (1 cup) all-purpose flour
120 g (1 cup) whole wheat pastry flour
pinch coarse salt
Preheat oven to 350°F. (I set my oven to true convection.)
Coat a 9×13 metal baking dish with baking spray, line with parchment paper (overhang on long sides), lightly coat with baking spray; set aside.
Make the Cake Batter: In a medium bowl whisk together flour, baking powder, salt, and cinnamon. Set aside.
In a large bowl stir together the mashed bananas, butter, sugar, eggs and vanilla until mixed well.
Add in the flour mixture and milk in alternating portions and stir until combined. Set batter aside while you make your crumb mixture.
Make the Crumb Filling & Crumb Topping: In a large bowl combine the cold, cubed butter, light brown sugar, and flours using a pastry blender or fork until a coarse crumb forms.
To Assemble: Pour 1/2 of the batter into the prepared pan. Top with 1/3 of the crumb mixture. Cover the filling with the remaining batter and then top with remaining crumb mixture.
Bake for 40 minutes on convection or up to 50-55 minutes in a conventional oven, or until the center is set and a toothpick comes out clean.
Serve warm or at room temperature. Store leftovers tightly wrapped at room temperature.
Before I share my fresh strawberry delights, I have to share these jewel-toned strawberry muffins that can be made year-round. I made them before picking our beloved Long Island strawberries. The crumb was very tender and tasty. I loved the subtle flavor from the coconut oil as well.
The recipe was adapted from Bon Appétit, contributed by Sarah Jampel. Even though I didn’t have difficulty with the jam leaking, next time, I would put more batter in the base of each muffin before filling so that it would be more centrally located. I would also reserve the freeze dried strawberry-sugar coating solely for the muffin tops. The jam-filled portion and the strawberry-sugar coated portion were two separate (and delicious) elements in the finished muffin. Both of these modifications are noted in the recipe below. I may also use my homemade jam in the filling. 🙂
The original recipe notes that this special strawberry-sugar could also be used to coat snickerdoodles. Great idea.
Yield: 12 muffins
For the Muffin Batter & Filling:
5 T refined coconut oil, room temperature
4 T unsalted butter, room temperature
100 g (1/2 cup) granulated sugar
67 g (1/3 cup, 5 T) light brown sugar
2 large eggs
1 1/2 tsp baking powder
1/4 tsp baking soda
1 1/2 tsp Diamond Crystal or 3/4 tsp Morton kosher salt
1 tsp pure vanilla extract
281 g (2 1/4 cups) all-purpose flour
240 g (1 cup) sour cream
1/2 cup thick strawberry or other berry jam (such as Bonne Maman Intense or Crofter’s)
For the Strawberry-Sugar Coating:
6 T unsalted butter
1/2 cup freeze-dried strawberries
6 T granulated sugar
pinch of kosher salt
Place a rack in middle of oven; preheat oven to 425°, preferably on convection.
Lightly coat the cups of a standard 12-cup muffin pan with nonstick spray.
Using a stand mixer or an electric mixer, beat oil, butter, granulated sugar, and brown sugar on medium-low speed until smooth, about 2 minutes.
Scrape down sides of bowl and beat again just to incorporate.
Add eggs, increase speed to medium, and beat until incorporated, about 1 minute (mixture might look a little curdled at this point and that’s okay).
Add baking powder, baking soda, salt, and vanilla and beat until combined and creamy.
Add flour in 3 additions, alternating with sour cream in 2 additions, beating on low speed after each addition until just combined. When last batch of flour is nearly incorporated, mix in any remaining dry bits by hand.
Scoop scant 2 tablespoons of batter into each muffin cup. (I used a cookie scoop.)
Using a damp finger, flatten each into a mostly even layer with a slight dip in the center.
Add 2 scant teaspoons jam to each center. (I used a 1/2 tablespoon cookie scoop.)
Divide remaining batter evenly among cups (about 2 tablespoons each). Take care to seal in jam as much as possible.
Using a damp finger, gently flatten surface.
Bake muffins until golden brown, 15 minutes on convection or up to 17–19 minutes in a standard oven.
Transfer to a wire rack and let cool 10 minutes in pan.
While the muffins are cooling, melt butter in the microwave in a glass dish or in a small saucepan over medium heat; set aside.
Finely grind strawberries in spice mill or with mortar and pestle. Transfer strawberry powder to a small bowl and mix in sugar and a pinch of salt. Transfer a small portion to a shallow bowl.
Gently remove muffins from pan; place on wire rack and set inside a rimmed baking sheet.
Generously brush each muffin top with melted butter and roll in strawberry sugar to coat, working over bowl to catch any excess. Repeat with remaining muffins, adding more strawberry sugar to bowl as needed.
Do ahead: Muffins can be made 3 days ahead. Store loosely covered at room temperature.
In Mexico, this simple cake is called panqué de elote, pan de elote or pastel de elote. It is often served for breakfast. We ate it for dessert after our family favorite Middle School Tacos on Cinco de Mayo this year and ate the leftovers for breakfast. Perfect. 🙂
This recipe was adapted from Milk Street. The original recipe accurately describes the texture as somewhere between cake and cornbread while hinting at custard. I used Greek yogurt and modified the method and the baking time for a convection oven. I served the cake with strawberries which was a lovely accompaniment.
Yield: 8 to 10 servings
3 medium ears fresh corn, preferably yellow, husked (see Note)
36 grams (1/4 cup) fine yellow cornmeal
14 ounce can sweetened condensed milk
57 grams (1/4 cup) plain whole-milk yogurt (I used whole-milk Greek yogurt)
165 grams (1 1/4 cups plus 2 tablespoons) all-purpose flour
2 T cornstarch
2 tsp baking powder
1/4 tsp table salt
2 large eggs, plus 2 large egg yolks
1/2 cup grapeseed or other neutral oil
Confectioners’ sugar, to serve
fresh strawberries, to serve
Heat the oven to 350°F with a rack in the middle position. (I set my oven to the true convection setting.)
Mist a 9-inch round cake pan with cooking spray.
Hold an ear of corn upright in the center of a medium bowl. Using a chef’s knife, cut the kernels from the corn. Repeat with the additional two ears. Measure 250 grams (1 1/2 cups) of the freshly cut kernels and add to a blender; if you have extra corn, reserve it for another use.
To the blender, add the cornmeal, condensed milk and yogurt, then puree until smooth, 15 to 20 seconds, scraping down the blender as needed. Let stand for 10 minutes. (I used a Vitamix.)
Meanwhile, in a small bowl, whisk together the flour, cornstarch, baking powder and salt.
To the blender, add the whole eggs and yolks, and the oil; blend on low until smooth, 5 to 10 seconds.
Pour the puree into a large bowl.
Add the flour mixture and whisk just until evenly moistened and no lumps of flour remain. It is important that you don’t whisk vigorously! Gentle mixing, just until no pockets of flour remain, will minimize gluten development so the finished cake is tender.
Transfer to the prepared cake pan and bake until golden and a toothpick inserted into the center of the cake comes out clean, 30 to 35 minutes in a convection oven or 40 to 45 minutes in a standard oven.
Cool in the pan on a wire rack for 30 minutes.
Run a paring knife around the pan to loosen the cake, then invert directly onto the rack and lift off the pan. Re-invert the cake onto a serving platter and cool completely, about 1 hour.
Serve dusted with Confectioners’ sugar with strawberry slices on the side.
Note: Don’t use frozen corn kernels—it results in a dense, gummy texture. Made with fresh corn, the cake’s crumb is much lighter and softer.