
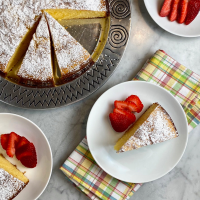
My daughter absolutely loves the “Line Friends” store in Times Square. The store features adorable plush versions of the characters from a Japanese and Korean messaging app called Line. Most center around a bear named “Brown.” As a pig enthusiast, my daughter owns two “Piggy Brown” plush in her personal collection. She requested a red velvet version of “Piggy Brown” to celebrate her 12th birthday! She also requested an Oreo-cream cheese frosting filling. The results were super cute and delicious.

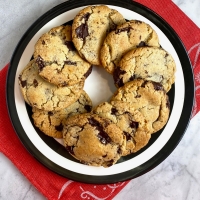
Both of my kids have winter birthdays. Because my son decided to celebrate his with a gold standard household favorite, a Rainbow Sprinkle Cake, I am combining their “birthday posts” by sharing their number cookie photos at the same time. For those of you who don’t know, my kids always have birthday sugar cookies to celebrate their age. 🙂 This year, my son celebrated his 14th birthday and my daughter celebrated her 12th. ❤

I thought that it was the perfect time to share this cake because a red velvet layer cake would also be a fabulous Valentine’s Day dessert. ❤ The cake recipe was adapted from Martha Stewart Living, the cream cheese frosting adapted from various sources. I used a single vanilla cupcake for the pig snout and bear nose, recipe from Sally’s Baking Addiction. The pig ears were made with reserved number cookie dough.
To Make the Red Velvet Layers:
- unsalted butter, for cake pans
- 2 1/2 cups (300 g) cake flour, not self-rising
- 1 teaspoon salt
- 1/4 cup cocoa powder, sifted
- 1 1/2 cups granulated sugar
- 1 1/2 cups canola oil
- 2 large eggs
- 3/4 tsp red gel food coloring plus 3 1/2 T water OR 1/4 cup red food coloring
- 1 teaspoon pure vanilla extract
- 1 cup buttermilk
- 1 1/2 teaspoons baking soda
- 2 teaspoons white vinegar
- Heat oven to 350 degrees, preferably on convection.
- Generously butter two 9-by-2-inch round cake pans. Line with parchment paper; butter the paper. Sprinkle with flour, and tap out the excess; set aside.
- In a medium bowl, whisk cake flour, salt, and sifted cocoa; set aside.
- In the bowl of an electric mixer fitted with the paddle attachment, combine the sugar and oil, and beat on medium speed until well combined.
- Add eggs, one at a time, beating well after each addition.
- Add food coloring and vanilla, and beat until well combined.
- Add flour mixture, alternating with buttermilk, scraping the sides of the bowl with a rubber spatula as needed.
- In a small bowl, mix baking soda and vinegar until combined. Add to batter, and beat for 10 seconds.
- Evenly divide batter between the prepared pans. (I use a kitchen scale to make sure that the batter is evenly distributed.)
- Bake until a cake tester inserted in the center of each cake comes out clean, 30 to 35 minutes.
- Transfer to a wire rack to cool in the pans for 5 minutes. Remove from the pans, and return to the rack to cool completely before frosting/decorating.

For the Vanilla Cupcake Pig Snout & Bear Nose:
- 1 egg white
- 2 T granulated sugar
- 2 T unsalted butter, melted
- 1 teaspoon vanilla
- 1 1/2 T milk
- 1/4 cup all-purpose flour
- 1/4 teaspoon baking powder
- Preheat oven to 350 degrees, preferably on convection.
- Coat 2 wells of a muffin pan with cooking spray or line with 2 liners.
- In a small mixing bowl, whisk together the egg white and sugar until combined.
- Stir in the vanilla, melted butter, and milk.
- Add flour and baking powder and mix everything together well.
- Divide the batter between two muffin pan wells and bake for 10-14 minutes.
- Let cool completely before frosting/decorating as desired.

For the Cream Cheese Frosting and to Decorate the Cake:
Yield: enough to generously frost one 9-inch layer cake (plus 1 cupcake)
- 16 ounces cream cheese, room temperature
- 1 cup (2 sticks) butter, room temperature
- 6 cups confectioner’s sugar, sifted
- 1 teaspoon pure vanilla extract
- 5 Oreos, crushed in a food processor
- pink gel food coloring
- cocoa
- brown m&m’s and pink tic tac’s for eyes and noses
- 1-2 T semi-sweet chocolate chips, melted
- Place cream cheese and butter in the bowl of a stand mixer.
- Beat until light and fluffy, about 2 minutes.
- Add sugar and vanilla. Beat, on low-speed to combine.
- If too soft, chill until slightly stiff, about 10 minutes, before using.
- Remove and place in separate bowls: 3/4 to 1 cup of icing for the bear face, 2-3 T icing for the top of the pig snout, 2-3 T icing for the bear nose, and 1 1/4 cup of icing for the Oreo filling.
- Tint the remaining icing light pink with food coloring, mixing well.
- Incorporate the crushed Oreos in the reserved 1 1/4 cups of filling icing. Spread on one of the layers.
- Place the second layer on top.
- Insert the cookie pig ears in between the cake layers until securely in place.
- Tint the 3/4 to 1 cup of reserved bear face icing with 1 T sifted cocoa, or until desired color is achieved.
- Tint the reserved 2-3 T of bear nose icing with pinches of sifted cocoa until desired color is achieved.
- Tint the reserved 2-3 T of pig snout icing with pink food coloring until desired color is achieved.
- Make a paper or parchment template to outline the edge of the bear face on top of the cake. Place on top of the second cake layer.
- Spread and swirl the light pink frosting around the sides and top of the cake, outside of the bear face template.
- Spread and swirl the reserved chocolate-brown frosting circle to form the bear face.
- Remove the domed top of the vanilla cupcake and trim to form the bear nose. Coat with reserved light brown icing and place on the bear face.
- Invert the cupcake bottom and coat the sides with light pink icing. Spread dark pink icing over the top. Place the snout in place on top of the cake.
- Use the m&m’s and tic tacs to form the noses and eyes.
- Place melted chocolate chips in a small ziplock bag. (I melted the chocolate in the microwave.) Cut the corner of the bag and pipe the bear’s mouth onto the cake.
- The cake can be stored in the refrigerator for up to 6 hours. (I stored it overnight.) Bring to room temperature before serving.

I’m bringing my red velvet Piggy Brown to share at Angie’s Fiesta Friday #262, co-hosted by Angie and Jhuls @The Not so Creative Cook. Enjoy! 🙂
![]()


Chinese New Year and it’s the Year of the Pig! Never heard of “Line Friends” but the cake is adorable – I wonder how could I make one and mail it to my brother in Hawaii – he use to raise them and has lots of wild ones roaming around 🙂
The year of the pig is going to be celebrated over here! 😉 My daughter’s world is full of pig plush, etc. Sounds like we need to visit your brother!
Such a cute cake and cookies! 🙂
Thank you so much Nancy 🙂
Great job decorating that cake! Your daughter gave a specific request, and you executed it well!
Thank you so much! 🙂 I can’t fulfill every order over here… but I was happy that Piggy Brown had such a round face! It made the job a little easier. 😉
The cake is absolutely adorable!! So are the number cookies! You’re so talented 👏👏
Thank you so much Angie! ❤
Amazing job, Josette. I wish I have patience in decorating cakes. This looks fantastic! Thank you for sharing at Fiesta Friday party! x
You make the most amazing things! I’m sure that you have more patience than me. Thanks, Jhuls. 🙂
Oh, my! This cake looks so awesome!
I would have a tough time cutting this, it is so beautiful. 🙂
It was a little sad to cut into it! My daughter can’t look at the photos of the slices. 😦
Pingback: Fiesta Friday #263 - Fiesta Friday