Pecan Polvorones

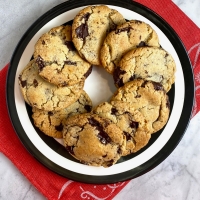
These polvorones are also known as Mexican wedding cookies (or cakes), Viennese crescents, or butterballs. I was inspired to make a classic version of these cookies after my daughter baked a few variations for Spanish Honor Society events at her high school.

I made them to share with family for Easter but they were truly a trial run for my Christmas cookie assortment. 😉 I used pecans but the original recipe also suggests using walnuts. The dough can be formed into a crescent or a ball prior to baking.

The recipe is from Baking Illustrated: The Practical Kitchen Companion for the Home Baker with 350 Recipes You Can Trust by the Editors of Cook’s Illustrated Magazine. I trust Cook’s Illustrated to have a foolproof recipe. 🙂 The cookies were tender and perfectly crumbly.

Yield: about 48 cookies

  • 2 cups whole pecans or walnuts, chopped fine
  • 10 oz (2 cups) unbleached all-purpose flour
  • 3/4 tsp fine sea salt
  • 2 sticks (16 T) unsalted butter, softened but still cool
  • 5 T (1/3 cup or 2 1/2 oz) granulated sugar
  • 1 1/2 tsp vanilla extract
  • 3 oz (3/4 cup) confectioners’ sugar, for rolling cooled cookies, plus more if needed
  1. Adjust the oven racks to the upper- and lower-middle positions. Preheat the oven to 325 degrees F. (I set my oven to true convection.)
  2. Line 2 large rimmed baking sheets with parchment paper.
  3. Mix 1 cup of the chopped nuts, the flour and salt in a medium bowl; set aside.
  4. Place the remaining cup of chopped nuts in a food processor and process until they are the texture of coarse cornmeal, about 10 pulses, being careful not to overprocess.
  5. Stir the rest of the nuts into the flour mixture and set aside.
  6. Process the granulated sugar in the food processor for 30 seconds to create a superfine texture. (no need to clean after processing the nuts)
  7. Using an electric or stand mixer, cream the butter and the granulated sugar until light and fluffy, about 90 seconds.
  8. Beat in the vanilla until combined. Scrape the sides and bottom of the bowl.
  9. Add the flour mixture and beat at low speed until the dough just begins to come together but still looks scrappy, about 15 seconds. Scrape the sides and the bottom of the bowl.
  10. Beat at low speed again until the dough is cohesive, 10 to 15 seconds longer. Do not overbeat.
  11. Working with about 1 tablespoon of dough at a time, ration the dough. (I used a cookie scoop.)
  12. The dough can be rolled into balls or formed into crescents. As the shape is formed, place on the prepared cookie sheets. (I formed the dough into balls. To form into crescents, form a ball and then roll into a 3-inch long rope. Place the rope on the baking sheet and then turn the ends to form a crescent.)
  13. Bake until the tops are pale golden and the bottoms are just beginning to brown, 17 minutes on convection or up to 19 minutes in a standard oven. Rotate the pans halfway through the baking time.
  14. Cool the cookies on the baking sheets for 2 minutes; remove with a wide metal spatula to a wire rack and cool completely, about 30 minutes.
  15. Working with 3 to 4 cookies at a time, roll the cookies in the confectioners’ sugar to coat them thoroughly. Gently shake off excess.
  16. Cookies can be stored in an airtight container up to 5 days. Before serving, roll the cookies in the confectioners’ sugar a second time to ensure a thick coating. Tap off the excess.

Vanilla Bean Sablés

I selected these wonderful cookies to share with family for Easter this year. I needed a dessert that would travel well and could be made in advance- perfect. They were reminiscent of Danish butter cookies. Everyone loved them!

This recipe is from Baking for the Holidays: 50+ Treats for a Festive Season by Sarah Kieffer. I modified the method and proportions. The recipe is similar to Dorie Greenspan’s version that I made several years ago. I used Greenspan’s technique to form the logs of dough.

I made one batch with unsalted butter and another with salted European butter. Both were delicous but we preferred the latter. Simple and classic.

Yield: about 30 cookies

  • 1 cup (2 sticks or 227 g) unsalted butter or salted butter* (preferably European), at room temperature
  • 2/3 cup (130 g) granulated sugar
  • 1/3 cup (40 g) confectioners’ sugar
  • 1 tsp fine salt (*if using salted butter reduce to 1/2 tsp salt)
  • 2 large egg yolks (for dough) plus 1 large egg yolk (for the sugar coating)
  • 1 vanilla bean, seeds scraped (or 2 tsp pure vanilla extract)
  • 2 cups (240 g) all-purpose flour
  • 1/2 cup (100 g) sanding sugar or other coarse sugar for sprinkling (I used turbinado)
  1. In the bowl of a stand mixer fitted with a paddle, beat the butter on medium speed until creamy, about 1 minute.
  2. Add the granulated and confectioners’ sugars, salt, and vanilla bean seeds and pod. Beat on medium speed until light and fluffy, 2 to 3 minutes.
  3. Scrape down the bowl and add the egg yolks; mix on low speed until incorporated.
  4. Add the flour and mix on low speed until just combined.
  5. Discard the vanilla bean pod.
  6. Lightly dust a work surface with flour. (I used a silicone pastry mat.)
  7. Transfer the dough and divide into two equal parts.
  8. Roll and form each half into a log about 1 1/2 inches in diameter and 7 to 7 1/2 inches long. (Alternatively, roll the entire batch into a 15 inch long log and then divide in half.)
  9. Place each log on a large piece of plastic wrap, a few inches longer than the log. Wrap in the plastic wrap and refrigerate until firm, about 2 hours, or overnight. (I place the logs in a wrapping paper tube to maintain the shape.)
  10. Preheat the oven to 350°F (180°C). (I set my oven to true convection.) Line two rimmed baking sheets with parchment paper.
  11. Lightly beat the remaining egg yolk.
  12. Spread the turbinado sugar in a 8 inch strip on a piece of plastic wrap.
  13. Brush one log with the egg yolk and roll in the sugar. Slice into 1/2-inch-thick rounds, rotating the log between each cut. (Rotating the log keeps the slices more even.)
  14. Transfer the rounds to the prepared baking sheets, spacing them about 2 inches apart. (I placed 8 to 10 cookies per sheet pan.)
  15. Bake until the edges are light golden brown but the centers are still pale, 14 to 16 minutes, rotating halfway through the baking time. (I baked mine for 14 (one pan) to 15 minutes (two pans) on convection.)
  16. Move the pan to a wire rack and let the cookies cool completely on the pan.
  17. Repeat with the second log. (I used 2 additional sheet pans.)
  18. Store cookies in an airtight container at room temperature for up to 3 days.

Buttery Jam Diagonals

These are a shortcut version of jam-filled thumbprint cookies. Wonderful! I made them at the tail end of my holiday baking to bring to a cookie exchange. Perfect.

This recipe was adapted from Bon Appétit, contributed by Shilpa Uskokovic. The original recipe recommends using thick, concentrated jams or spreads in the filling. I used Bonne Maman apricot preserves without any issues.

I loved the lemon zest in the cookie and lemon juice in the glaze. Buttery, bright and tasty. 🙂

Yield: about 2 dozen

  • 3/4 cup (1 1/2 sticks) unsalted butter, preferably cultured, at room temperature
  • 1/2 cup (100 g) granulated sugar
  • finely grated lemon zest from 1 large lemon
  • 1 tsp vanilla bean paste or vanilla extract
  • 1 tsp Diamond Crystal or 1/2 tsp Morton kosher salt, plus more
  • 1 large or extra-large egg yolk
  • 2 cups (240 g) all-purpose flour; plus more for dusting (optional)
  • 6 T raspberry or apricot jam (such as Bonne Maman Intense)
  • 1/3 cup (37 g; or more) powdered sugar, sifted
  • 2 tsp (or more) fresh lemon juice
  1. Using a stand mixer on medium-high speed, beat unsalted butter, granulated sugar, lemon zest, vanilla bean paste and salt in a large bowl until light and fluffy, about 3 minutes.
  2. Add 1 large egg yolk and beat until incorporated, about 1 minute.
  3. Add flour and beat on low speed until no dry streaks remain (be careful not to overmix).
  4. Turn dough out onto a surface and knead gently to bring together into a ball. Split dough in half (about 265 g each).
  5. Using your hands, roll each into a 10×1½” log (dough should be easy to handle; dust surface very lightly with flour if dough feels sticky).
  6. Place logs 3″ apart on a large parchment-lined baking sheet.
  7. Run your index finger or the round handle of a large wooden spoon down the entire length of each log through the center to create a deep channel (you want to push dough down as far as possible without tearing).
  8. Chill logs in freezer until firm, about 30 minutes.
  9. Meanwhile, place a rack in middle of oven; preheat to 350°F, preferably on convection.
  10. Remove logs from freezer, spoon about 3 tablespoons of jam along channel in each log.
  11. Bake logs until dough is set and golden brown underneath, 18–20 minutes.
  12. Let cool completely on baking sheet.
  13. Using a small knife, slice logs crosswise on a deep diagonal into 1″-wide pieces.
  14. Whisk powdered sugar, fresh lemon juice, and a large pinch of kosher salt in a small bowl until smooth. Glaze should be thick but pourable; adjust consistency with more powdered sugar or lemon juice if needed.
  15. Drizzle glaze over logs; let sit until glaze is set, at least 30 minutes.

Do ahead: Cookies can be baked 2 days ahead. Store, loosely covered, at room temperature.

Smitten Kitchen’s Classic Shortbread

Shortbread is pretty irresistible. Typically, recipes are only subtly different. I wanted to try this version because it resulted in a tender cookie, incorporated vanilla bean paste, and because it was Deb Perelman’s favorite.

The cookies were definitely more tender than any other shortbread I’ve made in the past. This is the result from using confectioners’ sugar instead of granulated sugar and from the semolina flour.

I made them for our St. Patrick’s Day dessert. Deb Perelman re-posted the recipe when the new Ted Lasso season began. 🙂 The recipe was adapted from smittenkitchen.com. I liked the cutting and shaping method. I weighed all of the dry ingredients.

Yield: about 24 cookies

  • 2 sticks (1 cup/230 grams/8 ounces) unsalted butter, cut into chunks
  • 80 grams (2/3 cup) powdered sugar
  • 1/2 teaspoon fine sea salt
  • 1 tsp vanilla bean paste (or almond extract or lemon or orange zest or extracts)
  • 250 grams (about 2 cups) all-purpose flour
  • 45 g (1/4 cup) semolina flour
  1. Heat your oven to 300°F. (I set my oven to convection.)
  2. Line an 8-inch square or 9-inch round cake pan with parchment paper. (No need to grease.)
  3. In a stand mixer, beat butter, sugar, and salt together, scraping frequently, until butter is soft. (see note below for alternatively using a food processor)
  4. Add flavoring of choice and flour, and mix just until combined, scraping down the bowl again. This is the same order as for a hand mixer, but with a hand mixer, you’ll want the butter semi-softened first.
  5. Add dough to the prepared baking pan in chunks. Use hands to press evenly into the pan, then an offset spatula or the base of a measuring cup to smooth the top.
  6. Bake for 20 minutes, then remove from the oven to cut into shapes. Leave oven on.
  7. Shape the cookies: For the 8-inch square pan: Repeatedly lay a bamboo skewer on the top of the cookie square to make an imprint to help you cut it into 3 even columns (about 2.5 inches wide) in one direction and 8 thin bars (just shy of 1 inch) in the other. Use the back of a wooden skewer to drag across the surface, making slightly indented lines first, then use a very thin, sharp paring knife to cut along these lines to the bottom of the pan. (For a 9-inch round pan: Use a 2 to 3-inch round cookie cutter or glass to cut the center. Then, use a skewer (explained above) to gently indent lines like sun rays or the hands of a clock from the inner circle to the outer edge of the cookie so that they’re your desired size wedges. Then use a very thin, sharp paring knife to cut along these lines to the bottom of the pan.
  8. Dock the cookies all over, about 1/3 deep, with the back of the skewer (for bigger dots) or the pointy end (for smaller holes).
  9. Return pan to the oven for another 25 to 35 minutes, until cookies have a deep golden edge but are mostly pale across the top. Watch closely in the last 10 to 15 minutes so they don’t over bake.
  10. Let cool in pan, or, if you’re impatient, let them cool for 10 minutes, and then remove them.

Note: In a food processor: Combine powdered sugar, salt, and flour in the work bowl, pulsing a few times. Add flavoring of choice and butter and pulse several times to chop the butter down into smaller pieces. Then, run the machine until it is fully incorporated, coming together in a smooth mass, 1 to 2 minutes more. Scrape down the bowl a few times for even mixing.

Do ahead: Shortbread keeps for 1 week, if not longer, at room temperature. It freezes well too, just wrap it tight.

Soft Stamped Gingerbread Cookies with Glaze

These soft gingerbread cookies were my daughter’s favorite in the assortment! I bought Nordic Ware snowflake cookie stamps after seeing them on the beautiful blog The View from Great Island.

The recipe was adapted from Ottolenghi’s dessert cookbook, Sweet, via theviewfromgreatisland.com. I modified the method using another post on the same blog that used cookie stamps.

I also used a 1 1/2 tablespoon cookie scoop instead of a 2 tablespoon scoop, resulting in less of the snowflake imprint being transferred. (I need a 2 tablespoon scoop!) I would also thin the glaze even more next time so that it would be more transparent, revealing more of the pattern of the stamp.

Alternatively, instead of the glaze, each cookie could be sprinkled with additional granulated sugar prior to baking.

Yield: 18 cookies (using 1 1/2 T scoop) (6 of each design)

For the Cookies:

  • 6 T unsalted butter, at room temperature
  • 1/3 packed cup plus 2 T (7 T) dark brown sugar
  • 1/3 cup (5 T) molasses (do not use blackstrap, which is bitter)
  • 1 large egg yolk
  • 1 3/4 cups plus 2 T all-purpose flour
  • 1 T Dutch-processed cocoa powder
  • 1/2 tsp baking soda
  • 1 tsp ground ginger
  • 1/2 tsp ground cinnamon
  • 1/8 tsp freshly ground cloves
  • 1/4 tsp coarse salt
  • 1/4 tsp freshly ground black pepper

To Roll and Stamp:

  • small bowl of granulated sugar

For the Glaze:

  • 1/2 cup confectioners’ sugar, sifted
  • 1/2 T unsalted butter, melted
  • 1/4 tsp vanilla extract
  • 1 T warm water, plus more for thinning
  1. Preheat the oven to 375 F. Put your cookie stamps in the freezer to chill.
  2. Cream together the butter, sugar, and molasses in a stand mixer (or with a hand held mixer).
  3. Beat in the egg yolk.
  4. Sift together the dry ingredients.
  5. Slowly add the dry ingredients to the butter mixture, beating on low until the dough comes together.
  6. Turn out the dough onto a lightly floured surface and knead it until all the floury crumbles are incorporated. Flatten the dough into a disk. I did not have to chill my dough before rolling, but if yours is very soft, you may want to.
  7. Use a medium (1 1/2 or 2 tablespoon) cookie scoop to portion out the dough.
  8. Roll the dough into balls and coat in granulated sugar.
  9. Stamp the balls of dough with your cookie stamp. Gently pry it off the cookie stamp by just nudging one corner. The cookie should come right off the stamp. (at this point, you can sprinkle the top with additional sugar if not making the glaze)
  10. Place the stamped cookies in the freezer for 15 minutes. (I placed them on a parchment paper-lined cutting board.)
  11. Place the cold cookies onto fresh parchment paper-lined, rimmed baking sheets, leaving about 2 inches between cookies.
  12. Bake for 8-10 minutes. You don’t want to over bake these cookies, so do a test cookie or two to figure out the best timing for your oven. The cookies will be soft when you remove them from the oven, but will firm up as they cool.
  13. Let the cookies cool for 5 minutes on the pan before carefully transferring to a rack to cool completely.
  14. When the cookies are cool, whisk the glaze ingredients together until they become a smooth thin glaze. Add more water if the glaze is too thick, it should have the consistency of maple syrup or a thin honey.
  15. Brush the cooled cookies with the glaze. You want the glaze to be thick enough to settle into the design for a beautiful emphasis. It will become more translucent as it dries.
  16. Let the glaze set up fully before serving or storing.

Ted Lasso’s Biscuits

Oh my- We were late to the party on this one. Ted Lasso is such an uplifting show! (I know that everyone else saw it years ago…) I must say that watching it makes you crave shortbread. 😉

Apple TV released the recipe for Ted Lasso’s special biscuits. This recipe was adapted from Apple TV via food52.com, contributed by Kelly Vaughan. I modified the method. I also sprinkled the top with turbinado sugar before and after baking- just like Ted.

Yield: about 18 biscuits

  • 1 cup (2 sticks or 8 oz or 227 g) salted butter (I used Kerry Gold)
  • 98 g (3/4 cup) confectioners’ sugar
  • 240 g (2 cups) all-purpose flour
  • sanding or turbinado sugar, for sprinkling
  1. Preheat the oven to 300℉, preferably on convection. Line an 8-inch square metal baking pan with a parchment paper sling.
  2. Using a stand mixer with a paddle attachment (or hand mixer), beat the butter for about three minutes, until it’s light and fluffy.
  3. Slowly add the powdered sugar, being careful not to get sugar all over your countertops and yourself.
  4. Add the flour, mixing about 90 seconds, or until the dough comes together.
  5. Transfer the dough to the prepared pan and flatten it using your hands or the base of a metal measuring cup to ensure that it’s spread evenly.
  6. Chill the dough in the refrigerator for 30 minutes.
  7. Sprinkle the top of the dough with sugar, if desired.
  8. Bake for 45 to 50 minutes on convection or up to 60 minutes in a standard oven, or until it looks golden-brown but is still a little soft to the touch.
  9. Once the biscuits have finished baking, remove from the oven and sprinkle with additional sugar, if desired.
  10. Immediately cut into pieces. I trimmed the edges and then sliced the square into 18 rectangles.
  11. Let it cool completely before serving (in a pink cardboard box, of course).

Pumpkin Snickerdoodles

I am almost out of time to post these festive fall cookies! :/ It is technically still fall until December 21st…

I made these cookies along with Vanilla Halloween Cupcakes for my kids and their friends on Halloween… yes- that was quite a while ago! I doubled the recipe below and it was perfect for a crowd, making 37 cookies.

The recipe was adapted from Sally’s Baking Addiction. I used an entire 15 ounce can of pumpkin purée for the double batch. I blotted it on (MANY MANY) paper towels prior to weighing it.

Yield: 18 cookies

For the Cookie Dough:

  • 1/2 cup (1 stick or 115g) unsalted butter, melted & slightly cooled
  • 1/4 cup (50g) packed light or dark brown sugar
  • 1/2 cup (100g) granulated sugar
  • 1 teaspoon pure vanilla extract
  • 6 Tablespoons (86g) blotted/dried pumpkin purée (see below)
  • 1 1/2 cups (188g) all-purpose flour
  • 1/4 teaspoon coarse salt
  • 1/4 teaspoon baking powder
  • 1/4 teaspoon baking soda
  • 1 1/2 teaspoons ground cinnamon
  • 1/4 teaspoon ground ginger
  • 1/4 teaspoon freshly ground nutmeg
  • 1/4 teaspoon freshly ground cloves
  • 1/4 teaspoon ground allspice

For the Cinnamon-Sugar Coating (you will have extra):

  • 1/2 cup (100g) granulated sugar
  • 1 teaspoon ground cinnamon
  1. Blot the pumpkin purée on paper towels, or squeeze in paper towels, changing the towels frequently, until it is quite dry. Set aside. (Squeeze as much of the moisture out of the pumpkin puree as you can before adding it to the cookie dough. This will help produce a less cakey cookie. Less moisture is a good thing here! Weigh (or measure 6 T) AFTER the pumpkin has been squeezed/blotted. Do not use pumpkin pie filling.)
  2. Whisk the melted butter, brown sugar, and granulated sugar together in a medium bowl until no brown sugar lumps remain.
  3. Whisk in the vanilla and blotted pumpkin until smooth. Set aside.
  4. Whisk the flour, salt, baking powder, baking soda, cinnamon, and remaining spices together in a large bowl.
  5. Pour the wet ingredients into the dry ingredients and mix together with a large spoon or rubber spatula. The dough will be very soft.
  6. Cover the dough and chill for 30 minutes or up to 3 days. Chilling the dough is a must for this recipe. (If doubling the recipe, chill the dough for 45 minutes.)
  7. Remove dough from the refrigerator. Preheat oven to 350°F (177°C). (I set my oven to true convection.) Line two large baking sheets with parchment paper or silicone baking mats.
  8. Using a cookie scoop, ration the dough, about 1.5 Tablespoons of dough per cookie, and roll each into balls.
  9. Mix the coating ingredients together, and then roll each cookie dough ball generously in the cinnamon-sugar coating.
  10. Arrange cookie dough balls 3 inches apart on the prepared baking sheets. Using the back of a spoon or the bottom of a cup/measuring cup, slightly flatten the tops of the dough balls. (Without doing so, the cookies may not spread.)
  11. Bake for 10 minutes on convection, or up to 11–12 minutes in a standard oven, or until the edges appear set. The cookies will look very soft in the center.
  12. Remove from the oven. If you find that your cookies didn’t spread much at all, flatten them out gently with the back of a spoon when you take them out of the oven.
  13. Cool cookies on the baking sheets for at least 10 minutes before transferring to a wire rack to cool completely. The longer the cookies cool, the better they taste! The flavor gets stronger and the texture becomes chewier. (The original recipe notes that she usually lets them sit, uncovered, for several hours before serving.) Chewiness and pumpkin flavor are even stronger on day 2.
  14. Store in an airtight container at room temperature for up to 1 week.

To Make Ahead (& Freeze):

You can make the cookie dough and chill it in the refrigerator for up to 3 days. Baked cookies freeze well up to 3 months. You can also freeze the cookie dough balls for up to 3 months before baking. It’s best to freeze them without the cinnamon-sugar coating. When you are ready to bake, remove the dough balls from the freezer, let sit for 30 minutes, preheat the oven, and then roll in the cinnamon-sugar topping.

Enter your email address to follow this blog and receive notifications of new posts by email.

Join 1,459 other subscribers

Recipe Categories

my foodgawker gallery
my photos on tastespotting

Top Posts & Pages

Mexican Sweet Corn Cake (Pan de Elote)
Vietnamese-American Garlic Noodles
Banana Bread with Crunchy Sugar Topping
Churro Cupcakes with Cinnamon Cream Cheese Frosting
One-Pan Orzo with Spinach & Feta
One-Pot Crispy Gnocchi with Burst Tomatoes & Fresh Mozzarella
One-Pan Shrimp Scampi with Orzo
Samin Nosrat's Buttermilk-Brined Roast Chicken
Italian Sausage & Mushroom Ragu with Pappardelle
Ravneet Gill's Perfect Chocolate Chip Cookies
Foodista Food Blog of the Day Badge