Veggie-Loaded Pad See Ew

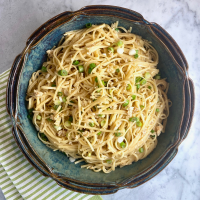
I cannot resist trying a new version of my husband’s favorite Thai takeout dish. I loved that this one seemed a little bit healthier. 🙂

I incorporated broccolini and baby cauliflower, trimming the large stalks, as well as snow peas. The original recipe also suggests using a combination of Chinese broccoli, bell peppers, and carrots.

This recipe was adapted from Half Baked Harvest Super Simple: More than 125 Recipes for Instant, Overnight, Meal-Prepped, and Easy Comfort Foods by Tieghan Gerard. I used wide rice noodles and modified the proportions and method. It was fabulous.

Yield: Serves 4 to 6

  • 24 oz fresh wide rice noodles
  • 5 T dark soy sauce
  • 5 T light soy sauce
  • 2 T fish sauce
  • 2 T oyster sauce
  • 2 T honey
  • 4 T canola or vegetable oil, divided
  • 6 garlic cloves
  • 8 to 10 cups mixed vegetables, trimmed into similar sizes (I used 8 oz broccolini, 12 oz baby cauliflower, and a large handful of snow peas)
  • 1-2 jalapeño chilies, seeded and chopped
  • 4 large eggs, beaten
  • 4 chopped scallions or 2 T chopped cilantro, for garnish
  1. Rinse the rice noodles under cold water to separate. Break into 4 to 6-inch pieces and set aside.
  2. Combine the soy sauces, fish sauce, oyster sauce, honey, and 1/2 cup water in a small bowl.
  3. Heat 3 T of the oil in a large skillet over medium-high heat. (I used a 14-inch stainless steel skillet.)
  4. When the oil shimmers, add the garlic, vegetables, and jalapeño; cook until the vegetables are tender, about 5 minutes.
  5. Push the vegetables to one side of the pan.
  6. Add the remaining 1 T of oil to the empty side of the pan and then add the eggs. Cook, gently scrambling, until just cooked through, about 2 minutes.
  7. Add the noodles and soy sauce mixture to the skillet and gently toss to combine all of the ingredients.
  8. Simmer for several minutes or until the sauce coats the noodles.
  9. Top with chopped scallions or cilantro and serve immediately.

Thai Stir-Fried Chicken with Cashews

This is an incredible version of this classic Thai dish. The vegetables are prepped while the chicken quickly marinates- genius. The marinade also deglazes the pan and doubles as the sauce.

The recipe was adapted from Milk Street, contributed by Courtney Hill. I served it over jasmine rice with stir-fried CSA yu choy and baby bok choy on the side. Everyone loved it. 🙂

Yield: Serves 4

  • 5 to 6 medium/large garlic cloves, finely grated or pushed through a garlic press
  • 3 T fish sauce
  • 2 T soy sauce
  • 2 tsp white granulated sugar
  • 2 tsp cornstarch
  • 1/2 teaspoon red pepper flakes
  • freshly ground black pepper or ground white pepper
  • 2 pounds boneless, skinless chicken thighs, trimmed and cut into 1-inch pieces
  • 2 T peanut or vegetable oil (I used canola)
  • 1 small to medium red bell pepper, stemmed, seeded and sliced into thin strips
  • 1 bunch scallions, cut into 1-inch lengths (I used about 5)
  • 1/2 cup roasted cashews
  • jasmine rice, for serving (I cooked 2 cups rice)
  1. In a medium bowl, whisk together the garlic, fish sauce, soy sauce, sugar, cornstarch, pepper flakes and 3/4 teaspoon pepper.
  2. Stir in the chicken, then marinate at room temperature for 15 minutes. Meanwhile, prep the vegetables.
  3. Drain the chicken in a fine mesh strainer set over a medium bowl, pressing the chicken to remove excess marinade. Do not discard the marinade!
  4. Stir 1/4 cup water into the marinade and set aside. (It will be used for the sauce.)
  5. In a 12-inch skillet over medium-high, heat the oil until barely smoking.
  6. Add the chicken in an even layer, cover with a splatter screen and cook, stirring occasionally, until golden brown, 8 to 10 minutes.
  7. Stir in the bell pepper, scallions and cashews.
  8. Stir the marinade mixture to recombine, add to the pan and bring to a simmer, scraping up any browned bits. Cook, stirring often, until the liquid thickens and clings to the chicken, about 2 minutes.
  9. Taste and season with pepper.
  10. Serve over or with rice on the side, as desired.

Thai Fried Rice

I have two fast and flavor-packed Thai dishes to share. This simple dish may be the perfect use for leftover rice. I loved incorporating vegetables from my CSA share into the meal. It was much lighter than a restaurant fried rice dish.

The recipe was adapted from Milk Street, contributed by Diane Unger. I was initially tempted to double the sauce but resisted- it was the perfect amount. I incorporated my CSA scallions and garnished the dish with sliced CSA cucumber and lime wedges.

We ate this dish with CSA zucchini rounds and sliced CSA garlic sautéed in brown butter and garnished with CSA dill. Delicious. The original recipe also suggests serving it with pickled chilies, a milder version of the Thai dressing nam prik; I included the recipe below.

For the Fried Rice:

Yield: 4 servings

  • 1 T Thai fish sauce
  • 1 tsp soy sauce
  • 1 tsp water
  • 1 tsp white granulated sugar
  • 4 cups cooked and chilled jasmine rice (or long grain white or Basmati rice)
  • 1 T peanut or vegetable oil (I used canola)
  • 2 eggs, lightly beaten
  • 4 oz cubed pancetta or thinly sliced pancetta, chopped
  • 4 large scallions, white and green parts thinly sliced, reserved separately
  • 1 large shallot, minced
  • 1 garlic clove, minced
  • 1/4 cup minced fresh cilantro
  • sliced cucumber and lime wedges, to serve
  • pickled chilies, to serve (optional- see below)
  1. In a bowl, stir together the fish sauce, soy sauce, water and sugar. Set aside.
  2. Use your hands to break up the rice so no clumps remain. Set aside.
  3. Lightly beat eggs in a small bowl. Set aside.
  4. Slice scallions, reserving white and green parts separately. Mince garlic and shallot in a mini food processor. Mince cilantro. Set aside.
  5. In a 12-inch (preferably non-stick) skillet over medium-high, heat the oil until just smoking. (I used a stainless all-in-one pan.)
  6. Pour in the eggs and cook, stirring, until just set. Transfer the eggs to a plate.
  7. Add the pancetta to the skillet and cook over medium until crisp. Using a slotted spoon, transfer to a paper-towel lined plate.
  8. Remove all but 1 tablespoon of the fat from the skillet and return to medium-high heat.
  9. Add the scallion whites, shallot and garlic, then cook until softened, about 1 minute.
  10. Add the rice and cook, stirring occasionally, until heated through, about 2 minutes.
  11. Stir the fish sauce mixture, then pour over the rice. Cook, stirring, until well mixed.
  12. Stir in the pancetta and egg, breaking up the egg.
  13. Transfer to a large platter or bowl and sprinkle with cilantro and scallion greens.
  14. Serve with cucumber slices, lime wedges, and pickled chilies, as desired.

For the Pickled Chilies:

Yield: 1 cup

  • 4 jalapeno chilies, stemmed, seeded (if desired) and thinly sliced crosswise
  • 1/4 cup fish sauce
  • 1/4 cup fresh lime juice
  • 1 tsp white granulated sugar
  1. In a bowl, stir together the chilies, fish sauce, lime juice and sugar.
  2. Refrigerate for at least 30 minutes or up to 1 week.

Korean Barbecue-Style Turkey Meatballs

I nearly doubled this recipe to intentionally have leftovers to enjoy later in the week. I couldn’t believe that they were completely gobbled up. Everyone absolutely loved them!

The meatballs were inspired by the savory-sweet flavors of traditional Korean barbecue. It was a very successful weeknight meal. 🙂 I loved that the flavor-packed meatballs were made in the oven and that they were served over rice.

This recipe was adapted from The New York Times, contributed by Kay Chun. I used ground turkey instead of ground beef and modified the method and proportions.

The original recipe also suggests serving the meatballs in a sandwich with mayonnaise or marinara sauce. I included the ingredients for an optional dipping sauce as well.

Yield: 4 to 6 servings

For the Meatballs:

  • 1 1/2 to 1 3/4 pounds ground turkey or ground beef (round or chuck) (I used 1 pound 11 oz ground turkey)(see Notes)
  • 3/4 cup finely crushed Ritz crackers (21 crackers) (can substitute bread crumbs)
  • 3/4 cups chopped scallions (I used 3 very large scallions), plus more for garnish
  • 3 1/2 T low-sodium soy sauce
  • 4 T minced garlic (I used 7 large cloves)
  • 1 3/4 tsp Diamond Crystal kosher salt
  • 1 3/4 tsp freshly ground black pepper

To Serve:

  • cooked rice, for serving, optional
  • kimchi, for serving, optional
  • 3 T soy sauce with 2 T distilled white vinegar combined to make a dipping sauce, optional
  1. Heat oven to 425 degrees. (I set my oven to convection roast.)
  2. In a large bowl, combine all of the ingredients and use your hands to gently mix.
  3. Shape the meat into 18 to 20 golf-ball-size rounds (about 2 inches in diameter). (I used a large cookie scoop.)(See Notes)
  4. Divide and arrange on two parchment paper-lined rimmed baking sheets.
  5. Bake until golden and cooked through, about 15 minutes. The internal temperature should be 165 degrees.
  6. Serve warm over rice, garnished with sliced scallions, as desired.

Notes:

  • This meatball mixture can be made ahead and left to marinate in the fridge for 3 hours or even overnight.
  • If using ground beef instead ground turkey: Use ground beef that is 85 percent lean meat, 15 percent fat, or 80 percent lean and 20 percent fat for juicier meatballs.

Pork & Asparagus Soba Noodles with Tahini-Chili Crisp Sauce

I have two recipes that incorporate chili crisp to share. This saucy dish was subtly spicy and very creamy from the tahini. It had a deep sesame flavor. Next time, I may add a bit more soy sauce and rice vinegar to the sauce.

This recipe was adapted from Bon Appétit, contributed by Kendra Vaculin. It was a perfect springtime meal.

Yield: Serves 4 to 6

  • 5 T (1/3 cup) chili crisp
  • 5 T (1/3 cup) tahini
  • 3 T soy sauce, plus more, to taste
  • 3 T unseasoned rice vinegar, plus more, to taste
  • 12 to 12.8 oz dried soba noodles
  • 1 bunch asparagus, trimmed, cut into 2″ pieces
  • 2 T vegetable oil (I used canola oil)
  • 1 lb ground pork
  • thinly sliced scallions and/or cilantro, for serving
  • 1/2 T to 1 T sesame seeds, toasted, for serving
  1. Whisk chili crisp, tahini, soy sauce, and rice vinegar in a small bowl. Taste and adjust seasonings, as desired. Set sauce aside.
  2. Toast sesame seeds in a 350 degree oven until fragrant and lightly browned, stirring once or twice, about 5 to 10 minutes.
  3. Cook soba noodles in a large pot of boiling water until almost cooked, about 2 minutes.
  4. Add asparagus pieces; cook until noodles are al dente and asparagus is crisp-tender, about 1 minute. Drain, reserving 1 cup cooking liquid.
  5. Rinse noodles and asparagus under cool running water; reserve pot.
  6. Heat oil in a medium skillet over medium-high.
  7. Cook ground pork in an even layer, undisturbed, until browned, about 5 minutes. Continue to cook, stirring and breaking up with a wooden spoon, until cooked through, about 3 minutes. (Use a splatter screen!)
  8. Add reserved sauce and cook, scraping up browned bits, 1 minute.
  9. Transfer pork mixture, noodles, and asparagus to reserved pot. Add 2/3 cup cooking liquid; cook over medium heat, stirring gently with spoon and adding more cooking liquid if needed, until noodles and meat are well coated, about 2 minutes.
  10. Serve topped with thinly sliced scallions, cilantro (if using), and toasted sesame seeds.

Warm Seven-Layer Skillet Dip

I planned our Super Bowl menu around this dip. Thankfully, it was very well received! I served it in the skillet and we scooped it out onto individual plates to gobble up with tortilla chips. Some chips may have also been dipped directly into the pan. 😉

The recipe was adapted from a Bon Appétit “healthyish” recipe, contributed by Shilpa Uskokovic. The original recipe convinced me to use American cheese slices in the queso layer to help it emulsify and to keep the cheese layer from solidifying.

We ate it as our Super Bowl appetizer followed by Poblano, Black Bean & Cheese Enchiladas with rice and refried beans, Trader Joe’s Elote chopped salad, followed by Churro Cupcakes with Cinnamon Cream Cheese Frosting for dessert. Great.

Yield: 8 Servings

For the Beans:

  • 4 T unsalted butter, cut into pieces
  • 1 large yellow onion, finely chopped (I used a food processor)
  • 6 garlic cloves, finely chopped (I used a food processor)
  • 1 1/2 tsp ground cumin
  • 3 canned chipotle chiles in adobo, finely chopped (I used a food processor)
  • 2 (15 oz) cans pinto beans, rinsed and drained
  • 1 T Diamond Crystal or 1 3/4 tsp Morton kosher salt
  • 1 T apple cider vinegar

For the Queso & Assembly:

  • 2 tsp adobo from a can of chipotle chiles in adobo
  • 1/2 tsp ground cumin
  • 1/4 tsp Diamond Crystal or Morton kosher salt, plus more
  • 4 oz yellow American cheese, coarsely grated or chopped or torn if using singles (about 1 cup) (I used 6 Trader Joe’s singles)
  • 3 oz Monterey Jack or pepper Jack cheese, coarsely grated (about 3/4 cup)
  • 2 ripe avocados, cut into 1/4-inch pieces
  • freshly squeezed juice from half a lime
  • 1/4 cup (4 T) sour cream
  • 1/2 cup good-quality salsa, drained if watery (I used Trader Joe’s Garlic Chipotle salsa)
  • 1 (4 oz) can fire-roasted, diced green chilies or 1/4 cup sliced pickled jalapeños
  • 4 scallions, green parts only, thinly sliced
  • 1/4 cup (packed) coarsely chopped cilantro
  • tortilla chips, for serving

To Make the Beans:

  1. Melt the butter, cut into pieces, in a medium deep skillet over medium heat. (I used a 10-inch cast iron skillet.)
  2. Add the chopped onion, stirring often, until tender and translucent, about 8 minutes. Monitor the heaat, and continue to cook, stirring often, until onion is pale golden brown, 3 to 4 minutes more.
  3. With the pan over medium heat, and add the chopped garlic cloves and cumin. Cook, stirring, until garlic is fragrant, about 1 minute.
  4. Add chopped chipotle chiles, pinto beans, rinsed, and salt. Pour in 1 cup water and bring to a simmer, mashing beans with a potato masher until mostly smooth.
  5. Cook, stirring often, until most of liquid is absorbed, about 2 minutes. (Beans should be risotto-like in consistency, loose enough to fall off a spoon.)
  6. Remove from heat and stir in apple cider vinegar. Cover and keep warm.

To Make the Queso & To Assemble the Dip:

  1. Whisk adobo, cumin, salt, and 1/2 cup water in a small saucepan and bring to a simmer over medium heat.
  2. Add chopped/grated American cheese and cook, whisking vigorously, just until cheese is melted and mixture is smooth, about 1 minute.
  3. Remove from heat and add grated Monterey Jack; whisk until cheese is melted and queso is smooth (return to low heat briefly if needed). (I cooked it over low for about 2 minutes to melt the additional cheese.)
  4. Using your hands to avoid bruising, toss the avocados pieces with lime juice and a large pinch of salt in a medium bowl.
  5. Uncover beans and pour queso over.
  6. Top with dollops of sour cream, followed by salsa, diced chilies, and then avocados.
  7. Scatter sliced scallions and chopped cilantro over the top.
  8. Serve dip warm in skillet with tortilla chips.

Do ahead: Beans can be made 3 days ahead. Let cool; cover and chill. Reheat over medium-low, thinning with water and seasoning with salt as needed.

Art Smith’s Turkey & Pinto Bean Chili

This simple and flavorful chili is a lighter version of a classic beef chili. It is wonderful healthy option. It was included on a list of Food and Wine magazine’s best chilis.

The recipe was adapted from Food and Wine, contributed by Art Smith. In the article he said, “(this) turkey chili is a big favorite of Oprah’s.” I modified the proportions and added additional toppings. We ate it with corn muffins and green salad on the side- it was still “healthy-ish!” 🙂

Yield: 6 to 8 

  • 1/4 cup extra-virgin olive oil
  • 3 pounds ground turkey
  • 1 large yellow onion, cut into 1/2-inch dice
  • 6 large garlic cloves, minced
  • 1 1/2 tablespoons chile powder
  • 1 teaspoon ground cumin
  • 1 teaspoon dried oregano
  • 3/4 teaspoon chipotle powder
  • 1 large or 2 small carrots, peeled and cut into 1/4-inch dice
  • 1 red bell pepper, cut into 1/2-inch dice
  • One 28-ounce can crushed tomatoes or tomato puree
  • three 15-ounce cans pinto beans, drained and rinsed
  • 3/4 cup beer (such as lager)( I used Negra Modelo)
  • 1 cup chicken stock or low-sodium broth
  • 1 tablespoon apple cider vinegar
  • 1 teaspoon chopped thyme
  • coarse salt and freshly ground black pepper
  • sliced scallions or chopped chives, for garnish
  • sour cream, for serving, optional
  • shredded cheese, for serving, optional
  1. In a large Dutch oven, heat 1 tablespoon of the oil until shimmering. Add half of the turkey and cook over medium-high heat, undisturbed, until browned on the bottom, about 3 minutes.
  2. Stir the turkey, season with salt and pepper, and cook until no pink remains, about 2 minutes longer. Transfer the cooked turkey to a bowl.
  3. Repeat with 1 more tablespoon of oil and the remaining turkey.
  4. Add the remaining 2 tablespoons of oil and the onion to the pot. Cook over moderate heat until softened, about 5 minutes.
  5. Add the garlic, chile powder, cumin, oregano and chipotle powder and cook, stirring, until fragrant, about 2 minutes.
  6. Return the turkey to the pot.
  7. Stir in the carrot, bell pepper, tomato puree, beans and lager and bring to a boil.
  8. Stir in the stock and vinegar, cover and simmer over low heat for 45 minutes.
  9. Add the thyme, season with salt and pepper and serve, garnished with scallions or chives.

Enter your email address to follow this blog and receive notifications of new posts by email.

Join 1,459 other subscribers

Recipe Categories

my foodgawker gallery
my photos on tastespotting

Top Posts & Pages

Mexican Sweet Corn Cake (Pan de Elote)
Vietnamese-American Garlic Noodles
One-Pot Crispy Gnocchi with Burst Tomatoes & Fresh Mozzarella
Banana Bread with Crunchy Sugar Topping
Ottolenghi's Butternut Squash Lasagna Pie
Churro Cupcakes with Cinnamon Cream Cheese Frosting
Oven-Baked Pearl Couscous with Roasted Tomatoes, Chickpeas & Feta
Ethiopian Chickpea Stew (Shiro Wat) & Stewed Collard Greens (Gomen Wat)
Chicago Public School Butter Cookies
Ina Garten's Wild Mushroom & Farro Soup
Foodista Food Blog of the Day Badge