I have two amazing pressure cooker (or Instant Pot) recipes to share.
I have never had a butter chicken that I didn’t like (or love!). This version may be my new favorite. The velvety texture in this dish is created with puréed cashews rather than the classic cream and butter. Absolutely wonderful!
The recipe was adapted from Milk Street Fast and Slow via Milk Street Magazine, contributed by Diane Unger. We ate it with warm naan, brown Jasmine rice, roasted cauliflower, and steamed spinach.
Yield: Serves 4 to 6
1 cup roasted salted cashews
14 1/2 oz can whole tomatoes (I used 1/2 28 oz can San Marzano tomatoes)
3 T salted butter, cut into 3 pieces, divided
2 small or 1 medium yellow onion(s), chopped
Kosher salt and freshly ground black pepper
6 medium garlic cloves, minced
1 T minced fresh ginger
1 T garam masala
1 tsp ground cumin
3/4 tsp sweet paprika
1/4 tsp cayenne pepper
2 1/2 pounds boneless, skinless chicken thighs, trimmed and cut into 1 1/2-inch pieces
2 T chopped fresh cilantro, divided
cooked rice and/or warm naan, for serving
In a blender, purée the cashews and 3/4 cup water until smooth, about 1 to 2 minutes. Transfer to a small bowl and set aside. (I used a Vitamix.)
In the same blender (no need to wash), purée the tomatoes with their juices until smooth, about 1 minute.
Put a 6 or 8-quart pressure cooker on the stove over medium-low to medium heat (on a 6-quart Instant Pot, select Normal Sauté).
Add 2 tablespoons of the butter and let melt.
Add the chopped onion and 1 teaspoon of salt. Cook, stirring occasionally, until softened, 3 to 5 minutes.
Add the garlic, ginger, garam masala, cumin, paprika, and cayenne. Cook, stirring, until fragrant, about 30 seconds.
Stir in the chicken and tomato purée. Distribute in an even layer.
Place the lid on the pressure cooker and lock into place. (On an Instant Pot: Press Cancel, lock the lid in place and move the pressure valve to Sealing; Select Pressure Cook or Manual.)
Bring the pressure level to high over high heat. Once pressure level is achieved, set the cooking time to 10 minutes.
When pressure cooking is complete, quick-release the steam by moving the pressure valve to vent. Carefully open the pot.
Stir the cashew purée and remaining 1 tablespoon of butter into the chicken mixture, scraping the bottom of the pot.
Put the pot over medium-low heat and sauté, stirring often, until the sauce has thickened and coats the chicken, 4 to 5 minutes.
Let cool for about 5 minutes. Stir in half of the cilantro. Taste and season with salt and pepper.
My husband said, “I love dishes like this!” Easy to prepare and packed with flavor.
The recipe was adapted from The New York Times, contributed by Mark Bittman. I modified the proportions for a crowd. We ate it with rice and salad.
Although the dish is successful after a brief marinade, it would be even more flavorful if the marinating time was doubled- still quick. 🙂 Nice.
Yield: 8 to 10 servings
15cloves garlic, peeled
2 large onions, quartered
3 T fresh oregano (or 1 T dried oregano)
2 T ground cumin
3/4 tsp cayenne, or to taste
1/4 tsp ground cloves
coarse salt and freshly ground black pepper
3 T grape seed oil (or other neutral oil)
freshly squeezed juice from 1 orange (about 6 T)
freshly squeezed juice from 2 limes (about 6 T)
about 4 1/2 to 5 pounds boneless, skinless chicken thighs
chopped cilantro, for garnish
Preheat a gas grill, start a wood or charcoal fire or preheat a broiler; the fire should be moderately hot, and the rack should be about 4 inches from the heat source.
Combine the garlic, onion, oregano, cumin, cayenne, cloves, salt, pepper and oil in a blender or small food processor, and blend until fairly smooth. (I used a Vitamix.)
Add the juices, blend, then taste and adjust seasoning; the flavors should be powerful.
Season the chicken with salt and pepper.
Smear sauce over chicken; if time allows, marinate 30 minutes or so. (I may try marinating for 60 minutes next time.)
Grill 6 to 8 minutes a side, or until meat is nicely browned and cooked to an internal temperature of 165 degrees F.
This is an incredible version of this classic Thai dish. The vegetables are prepped while the chicken quickly marinates- genius. The marinade also deglazes the pan and doubles as the sauce.
The recipe was adapted from Milk Street, contributed by Courtney Hill. I served it over jasmine rice with stir-fried CSA yu choy and baby bok choy on the side. Everyone loved it. 🙂
Yield: Serves 4
5 to 6 medium/large garlic cloves, finely grated or pushed through a garlic press
3 T fish sauce
2 T soy sauce
2 tsp white granulated sugar
2 tsp cornstarch
1/2 teaspoon red pepper flakes
freshly ground black pepper or ground white pepper
2 pounds boneless, skinless chicken thighs, trimmed and cut into 1-inch pieces
2 T peanut or vegetable oil (I used canola)
1 small to medium red bell pepper, stemmed, seeded and sliced into thin strips
1 bunch scallions, cut into 1-inch lengths (I used about 5)
1/2 cup roasted cashews
jasmine rice, for serving (I cooked 2 cups rice)
In a medium bowl, whisk together the garlic, fish sauce, soy sauce, sugar, cornstarch, pepper flakes and 3/4 teaspoon pepper.
Stir in the chicken, then marinate at room temperature for 15 minutes. Meanwhile, prep the vegetables.
Drain the chicken in a fine mesh strainer set over a medium bowl, pressing the chicken to remove excess marinade. Do not discard the marinade!
Stir 1/4 cup water into the marinade and set aside. (It will be used for the sauce.)
In a 12-inch skillet over medium-high, heat the oil until barely smoking.
Add the chicken in an even layer, cover with a splatter screen and cook, stirring occasionally, until golden brown, 8 to 10 minutes.
Stir in the bell pepper, scallions and cashews.
Stir the marinade mixture to recombine, add to the pan and bring to a simmer, scraping up any browned bits. Cook, stirring often, until the liquid thickens and clings to the chicken, about 2 minutes.
Fried chicken is an essential part of my husband’s annual birthday feast. This may be the best version I’ve ever made. Not only was the meat incredibly tender from the lemony and garlicky brine, the seasoning in the crispy coating was super delicious as well. Fabulous.
The recipe was first published in Food and Wine in 2007 and then updated and re-published as a staff-favorite recipe in 2022. It was contributed by Thomas Keller who serves it every other Monday at his restaurant Ad Hoc in Napa Valley. The recipe was adapted from his book Ad Hoc at Home.
I adapted the recipe by modifying the method and proportions, and by substituting boneless, skinless chicken thighs for bone-in chicken pieces. I brined the chicken the day that I fried it. I also used a countertop electric skillet to more easily maintain an even cooking temperature- absolutely life changing. (Thank you to my Mother-in-Law for giving it to me!)
I made 15 chicken thighs- enough to have leftovers for days. That’s how we like to extend birthday celebrations in my house. 🙂 I included instructions on how to successfully re-heat the chicken below.
10 to 15 boneless, skinless chicken thighs, trimmed and patted dry
For the Seasoned Flour & To Finish the Dish:
3 cups (about 12.75 oz) all-purpose flour
2 T garlic powder
2 T onion powder
2 tsp paprika
2 tsp cayenne pepper
2 tsp kosher salt, divided
1 tsp freshly ground black pepper, divided
2 cups whole buttermilk
about 2 quarts canola or peanut oil, for frying
fresh rosemary and thyme sprigs, for garnish
fine sea salt or ground fleur de sel, for garnish
To Brine the Chicken:
In a large bowl, combine the water and salt; stir until dissolved.
Pour the salt water into a 2 gallon zip-top bag inside a large pot. (I used a stainless pasta pot.) Add the honey, bay leaves, garlic, peppercorns, thyme, parsley, and lemon halves; stir to combine.
Add the trimmed boneless, skinless chicken thighs, being sure they’re completely submerged; seal the bag. Refrigerate for 10 to 12 hours. (Do not refrigerate for longer than 12 hours or the chicken may become too salty.)
Remove chicken thighs from the brine and pat dry with paper towels. Scrape off any herbs or peppercorns stuck to the meat. Discard the brine.
Let the chicken stand until it comes to room temperature, about 30 to 45 minutes.
To Coat and Cook the Chicken:
Fill a 12-inch electric skillet with about 2 quarts of oil; heat to 320-325 degrees. (Alternatively, fill a large pot with oil to a depth of 2 inches; heat over medium to medium-high to 320 degrees.)
Set a wire rack over a foil and paper towel-lined, rimmed, baking sheet. Reserve for cooked chicken.
Line a second rimmed baking sheet with parchment paper. Reserve for raw chicken.
In a large bowl, whisk the flour, garlic powder, onion powder, paprika, cayenne, 1 teaspoon of kosher salt, and 1/2 teaspoon black pepper. Divide the mixture between two glass pie dishes (about 1 1/2 cups each).
Put the buttermilk in a large, shallow bowl. Season with remaining 1 teaspoon of salt and 1/2 teaspoon black pepper.
Working with one chicken thigh at a time, dip the chicken in the first bowl of flour; turn to coat and pat off excess. Dip into buttermilk, letting excess drip back into the bowl. Dip into the second dish of the flour mixture.
Transfer the coated chicken to the baking sheet lined with parchment paper. Repeat with remaining pieces. (I continued to do this while simultaneously starting to cook some of the chicken thighs.)
Carefully lower the chicken thighs into the hot oil, adjusting the heat as needed to maintain a temperature of 320 degrees. (I cooked 3 thighs at a time.)
Cook for 2 minutes, and the carefully turn over using tongs, continuing to cook and turn as needed for even browning. (I had 1 set of tongs for transferring the raw chicken and 1 set of tongs to turn the chicken while cooking.)
The chicken is cooked when it is a deep golden brown, very crisp, and an instant read thermometer inserted in the thickest portion reads 165 degrees, about 9 minutes total.
Transfer the cooked chicken to the prepared wire rack set over the lined baking sheet. Let it rest while you fry the remaining chicken pieces. Sprinkle with fine sea salt to taste, if desired.
Transfer the fried chicken to a platter, garnish with the herb sprigs or chopped herbs. (Alternatively, the rosemary and thyme can be cooked in the hot oil for a few seconds before being used as a garnish.)
Serve hot or at room temperature.
Notes:
The original recipe recommends cooking chicken breasts and wings at 340 degrees, if using instead of thighs or drumsticks.
If using bone-in skin-on chicken (the best meat-to-crust ratio is achieved using 2 1/2 to 3 pound whole chickens), let the pieces rest skin-side up. Modify the cooking time as needed to reach an internal temperature of 165 degrees (about 12 minutes for thighs and drumsticks, 7 minutes for breasts, and 6 minutes for wings).
To reheat leftover fried chicken do not be tempted to use a microwave! Reheat uncovered, placed on a wire rack over a rimmed baking sheet in a 400 degree oven for 10 to 15 minutes.
Ha! Milk Street Magazine published these two flavor-packed dishes on the same page so I served them together. We ate the chicken and rice with roasted cauliflower. Delicious. 🙂
The avocado-cilantro sauce was amazing and would compliment any meat or chicken. It was inspired by a standard accompaniment to grilled meats in Venezuela called guasacaca. The recipe was adapted from Milk Street Magazine, contributed by Courtney Hill.
The rice was inspired by an everyday dish in Pakistan and India called jeera (or zeera) rice. The recipe was adapted from Made in India by Meera Sodha, via Milk Street Magazine, contributed by Dimitri Demopolous. The original recipe notes that it is ideal for pairing with any roasted or grilled vegetables or meat as well as with curries or dal.
To prepare these dishes together, I began by making the rice dish. While the rice cooked and rested, I prepared the chicken and the sauce.
For the Chicken & Avocado-Cilantro Sauce:
Yield: Serves 6
2 1/2 pounds boneless, skinless chicken thighs (about 10) OR 3 pounds bone-in, skin-on chicken thighs OR breasts OR a combination, trimmed and patted dry
4 T extra-virgin olive oil, divided
Kosher salt and ground black pepper
2 ripe avocados, halved, pitted and peeled
1 1/2 cups lightly packed cilantro OR flat-leaf parsley, plus extra chopped, to serve
1 jalapeño chili, stemmed and seeded
1/2 medium white or yellow onion, roughly chopped
3 T white vinegar
optional garnish: Lime wedges OR crumbled queso fresco OR chopped pickled jalapeños OR a combination
Heat the oven to 425°F with a rack in the middle position and another rack in the highest position. (I set my oven to convection roast.)
On a foil or parchment paper-lined rimmed baking sheet, toss the chicken with 2 tablespoons of the oil, then season with salt and pepper. (Using foil is a better choice if broiling the skinless meat after roasting.)
If using skinless meat, arrange thighs “skin side down” and roast about 10 minutes. Flip over and roast an additional 5 minutes. Remove pan from oven and adjust oven to the broil setting.
Place pan on the top rack and broil to finish browning the meat, an additional 2 to 3 minutes. Meat should reach an internal temperature of 165. (Alternatively, if using skin-on, bone-in meat: Arrange skin side up and roast until the thickest part of the breast (if using) reaches about 160°F and the thickest part of the largest thigh (if using) reaches about 175°F, 30 to 40 minutes. Remove from the oven and let rest for 10 minutes.)
Meanwhile, in a food processor, combine the avocados, cilantro, jalapeño, onion, vinegar, remaining 2 tablespoons oil and 1/4 teaspoon each salt and pepper. Process until smooth, 1 to 2 minutes. (I used a Vitamix which made the sauce incredibly creamy.)
Transfer the chicken to a platter and pour over any accumulated juices. (If serving with cumin rice, plate chicken over the rice and pour over any accumulated juices.)
Sprinkle with chopped cilantro (or other optional garnishes listed above) and serve with the sauce.
For the Cumin Rice with Caramelized Onions:
Yield: Serves 6
3 T ghee OR salted butter, cut into 3 pieces, divided
2 medium yellow onions, halved and thinly sliced
kosher salt and freshly ground black pepper
2 teaspoons cumin seeds
2 cardamom pods
1 1/2 cups basmati rice, rinsed and drained
chopped fresh cilantro, to serve, optional
In a large saucepan over medium-high, melt the ghee. (I used a 4-quart stainless steel pot.)
Add the onions and 1/2 teaspoon salt. Cook, stirring occasionally to start and more often once browning begins, until the onions are deeply caramelized, 10 to 15 minutes; reduce the heat if the onions brown very unevenly or too quickly.
Meanwhile, rinse the rice. Drain and set aside.
Add the cumin seeds and cardamom pods to the browned onions; cook, stirring, until fragrant, about 1 minute.
Stir in the rice, 2 cups water and 1 teaspoon salt. Bring to a simmer over medium-high, then reduce to low, cover and cook without stirring until the rice has absorbed the liquid, 15 to 18 minutes.
Remove from the heat and let stand, covered, for 10 minutes.
Using a fork, fluff the rice; remove and discard the cardamom. Taste and season with salt and pepper. If desired, serve sprinkled with cilantro.
I have two wonderful chicken and rice dishes to share. This dish was part of The New York Times’ List of The Best of 2022- I’m surprised that I missed it when it was first published. It was fresh, delicious, and can be enjoyed in every season. I prepared the chicken in a cast iron skillet on the stove, but it could also be grilled in warmer weather.
The recipe was adapted from The New York Times, contributed by Ali Slagle. I omitted the olives and modified the method and proportions. I served the chicken over white Basmati rice with the cucumber salad and roasted broccoli on the side. Great.
Yield: 6 servings
2 cups plain whole milk Greek yogurt
6 garlic cloves, finely grated or pushed through a garlic press
Kosher salt (Diamond Crystal)
freshly ground black pepper
1 1/4 tsp dried oregano or mint
2 1/2 to 3 pounds (about 10) boneless, skinless chicken thighs, trimmed and patted dry
1 1/2 pounds cucumbers (preferably Japanese, Persian or mini, seedless cucumbers)
1 pound ripe tomatoes (I used grape tomatoes, halved)
2 T extra-virgin olive oil, plus more as needed
4 ounces feta, crumbled (about 3/4 cup)
1/2 cup Kalamata olives, pitted and halved (I omitted them)
white or brown Basmati rice, for serving, optional (I used 2 cups of rice with 1 tsp salt)
If serving chicken over rice, prepare the rice according to the package directions. (I used a rice cooker.)
In a large bowl, stir together the yogurt and garlic; season to taste with salt and pepper. Transfer 1/2 cup of the yogurt to a medium bowl and reserve.
Coat the chicken: To the large bowl, add the oregano and stir to combine. Season the chicken all over with 2 teaspoons salt and a few grinds of pepper. Add the chicken to the large bowl and turn to coat; set aside.
Start the salad: Smash the cucumbers with the side of your knife until craggy and split. Rip into 1-inch pieces and transfer to a colander placed in the sink. Slice or chop the tomatoes into bite-size pieces. Add to the cucumbers along with 1 1/2 teaspoons salt. (It may seem like a lot of salt, but most will drain away.) Toss to combine and leave to drain.
In a large nonstick or well-seasoned cast-iron skillet, heat the olive oil over medium. (I used a 12-inch cast iron skillet.)
Scrape excess marinade off the chicken, then cook the chicken in batches, adding oil to the pan if necessary, until it’s well browned and releases from the pan, 5 to 7 minutes. Use a splatter screen! Flip and cook until cooked through, another 5 to 7 minutes, or until the internal temperature reaches 165 degrees. Transfer to plates to rest. (For grilling info, see Tip.)
To the medium bowl of yogurt, add the feta and mash with a fork until a chunky paste forms.
Shake the cucumbers and tomatoes to get rid of any excess moisture. Add to the feta yogurt along with the olives (if using) and stir until coated. The balance is dependent on your produce and feta, so season to taste with salt and pepper until flavors are vivid.
Serve the chicken over rice with the cucumber-feta salad on the side.
Tip: To grill the chicken: Heat a grill to medium and clean and grease the grates. Grill the chicken over direct heat until it’s well browned and releases from the grates, 5 to 7 minutes. Flip and cook until cooked through, another 5 to 7 minutes. (For a gas grill, close the lid between flips.)
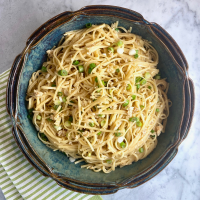
This chicken and noodle stir-fry dish, tallarín saltado, is a classic Peruvian dish. According to Milk Street, simple stir-fry dishes like this are a staple of the Chinese-influenced cuisine known as chifa. Chifa cuisine combines South American and East Asian flavors and ingredients.
This recipe was adapted from Milk Street, contributed by Malcolm Jackson. Jackson uses balsamic vinegar in place of the more traditional red wine vinegar and substitutes a jalapeño or Fresno chile for the ají amarillo chile that would be used in Peru. The dish was fresh, fast and fabulous. We loved it!
We ate the stir-fry with roasted broccoli- a strange combination- but it was ultimately a nice compliment. 🙂
Yield: Serves 6
12 ounces spaghetti (I used whole wheat)
kosher salt and freshly ground black pepper
4 1/2 T oyster sauce
3 T light soy sauce
3 T balsamic vinegar
4 T grapeseed oil or other neutral oil
1 1/2 pounds boneless, skinless chicken thighs (about 5), trimmed and cut into 3/4 strips
1 large red onion, halved and sliced into 1/2-inch wedges
6-7 garlic cloves, thinly sliced
1 large red, yellow, or orange bell pepper, stemmed, seeded, and thinly sliced
1 Fresno or jalapeño chile, stemmed, halved, and thinly sliced lengthwise
freshly squeezed juice of 1 lime, plus wedges to serve
1/4 cup plus 2 T lightly packed fresh cilantro leaves
In a large saucepan, bring 2 quarts water to a boil. Meanwhile, prep all remaining ingredients.
Add the pasta and 1 tablespoon salt to the boiling water; cook, stirring occasionally, until just shy of al dente. Reserve about 1 cup of the cooking water, then drain. (I cooked my pasta for 5 minutes.)
In a small bowl, stir together the oyster sauce, soy sauce and vinegar; set aside.
In a 14-inch skillet over medium-high, heat the oil until barely smoking. (I used a stainless steel skillet.)
Add the chicken, onion, and garlic, distributing the ingredients evenly, then sprinkle with salt and pepper. Cook, without stirring, until the chicken is well browned on the bottom and releases easily from the pan, about 4 to 5 minutes. (See Tip)
Add the oyster sauce mixture and cook, stirring and scraping up any browned bits, until the sauce is syrupy, 2 to 3 minutes.
Add the bell pepper and chile; cook, stirring occasionally, until the vegetables begin to soften, about 2 minutes.
Add the pasta and stir to combine. Add 1/2 cup of the reserved pasta water and cook, tossing constantly, until the noodles are al dente, 2 to 3 minutes.
Off heat, stir in the lime juice. Taste and season with salt and pepper.
Place half of the stir-fry in a serving bowl and sprinkle with half of the cilantro. Repeat with the remaining stir-fry and cilantro. Serve with lime wedges on the side, as desired.
Tip: Don’t stir the chicken too soon after adding it to the skillet. Left undisturbed, it forms a fond, or browned bits that stick to the skillet. The dish’s flavor develops when the oyster sauce mixture deglazes that fond. After adding the pasta water, stir vigorously; this helps the sauce come together.