Pumpkin Snickerdoodles

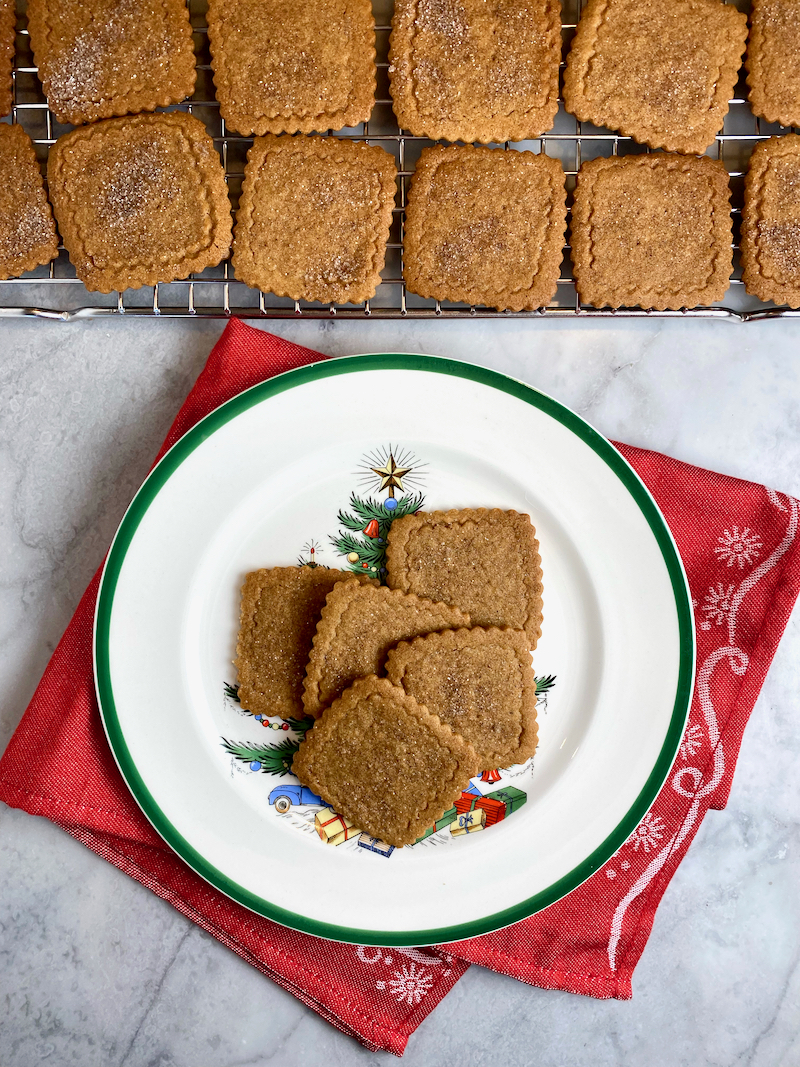
I am almost out of time to post these festive fall cookies! :/ It is technically still fall until December 21st…

I made these cookies along with Vanilla Halloween Cupcakes for my kids and their friends on Halloween… yes- that was quite a while ago! I doubled the recipe below and it was perfect for a crowd, making 37 cookies.

The recipe was adapted from Sally’s Baking Addiction. I used an entire 15 ounce can of pumpkin purée for the double batch. I blotted it on (MANY MANY) paper towels prior to weighing it.

Yield: 18 cookies

For the Cookie Dough:

  • 1/2 cup (1 stick or 115g) unsalted butter, melted & slightly cooled
  • 1/4 cup (50g) packed light or dark brown sugar
  • 1/2 cup (100g) granulated sugar
  • 1 teaspoon pure vanilla extract
  • 6 Tablespoons (86g) blotted/dried pumpkin purée (see below)
  • 1 1/2 cups (188g) all-purpose flour
  • 1/4 teaspoon coarse salt
  • 1/4 teaspoon baking powder
  • 1/4 teaspoon baking soda
  • 1 1/2 teaspoons ground cinnamon
  • 1/4 teaspoon ground ginger
  • 1/4 teaspoon freshly ground nutmeg
  • 1/4 teaspoon freshly ground cloves
  • 1/4 teaspoon ground allspice

For the Cinnamon-Sugar Coating (you will have extra):

  • 1/2 cup (100g) granulated sugar
  • 1 teaspoon ground cinnamon
  1. Blot the pumpkin purée on paper towels, or squeeze in paper towels, changing the towels frequently, until it is quite dry. Set aside. (Squeeze as much of the moisture out of the pumpkin puree as you can before adding it to the cookie dough. This will help produce a less cakey cookie. Less moisture is a good thing here! Weigh (or measure 6 T) AFTER the pumpkin has been squeezed/blotted. Do not use pumpkin pie filling.)
  2. Whisk the melted butter, brown sugar, and granulated sugar together in a medium bowl until no brown sugar lumps remain.
  3. Whisk in the vanilla and blotted pumpkin until smooth. Set aside.
  4. Whisk the flour, salt, baking powder, baking soda, cinnamon, and remaining spices together in a large bowl.
  5. Pour the wet ingredients into the dry ingredients and mix together with a large spoon or rubber spatula. The dough will be very soft.
  6. Cover the dough and chill for 30 minutes or up to 3 days. Chilling the dough is a must for this recipe. (If doubling the recipe, chill the dough for 45 minutes.)
  7. Remove dough from the refrigerator. Preheat oven to 350°F (177°C). (I set my oven to true convection.) Line two large baking sheets with parchment paper or silicone baking mats.
  8. Using a cookie scoop, ration the dough, about 1.5 Tablespoons of dough per cookie, and roll each into balls.
  9. Mix the coating ingredients together, and then roll each cookie dough ball generously in the cinnamon-sugar coating.
  10. Arrange cookie dough balls 3 inches apart on the prepared baking sheets. Using the back of a spoon or the bottom of a cup/measuring cup, slightly flatten the tops of the dough balls. (Without doing so, the cookies may not spread.)
  11. Bake for 10 minutes on convection, or up to 11–12 minutes in a standard oven, or until the edges appear set. The cookies will look very soft in the center.
  12. Remove from the oven. If you find that your cookies didn’t spread much at all, flatten them out gently with the back of a spoon when you take them out of the oven.
  13. Cool cookies on the baking sheets for at least 10 minutes before transferring to a wire rack to cool completely. The longer the cookies cool, the better they taste! The flavor gets stronger and the texture becomes chewier. (The original recipe notes that she usually lets them sit, uncovered, for several hours before serving.) Chewiness and pumpkin flavor are even stronger on day 2.
  14. Store in an airtight container at room temperature for up to 1 week.

To Make Ahead (& Freeze):

You can make the cookie dough and chill it in the refrigerator for up to 3 days. Baked cookies freeze well up to 3 months. You can also freeze the cookie dough balls for up to 3 months before baking. It’s best to freeze them without the cinnamon-sugar coating. When you are ready to bake, remove the dough balls from the freezer, let sit for 30 minutes, preheat the oven, and then roll in the cinnamon-sugar topping.

Speculoos with Spiced Sugar Topping

I cannot resist trying a new Speculoos recipe. I am mildly obsessed with these crispy spice cookies! 😉 I love the spiced sugar sprinkle on this delicious version. They may be my new favorite!

This recipe was adapted from 177milkstreet.com, contributed by Erika Bruce. I modified the method and used a combination of molasses and light corn syrup instead of dark corn syrup. Next year I need to make a double batch!

Yield: about 60 2-inch square cookies

  • 3/4 tsp ground cinnamon
  • 3/4 tsp ground coriander
  • 3/4 tsp ground allspice
  • 2 T granulated sugar
  • 320 g (2 2/3 cups) cake flour, plus more for dusting
  • 1 1/2 tsp baking soda
  • 1/8 tsp freshly ground cloves
  • 12 T (1 1/2 sticks) salted butter, cool room temperature
  • 218 g (1 cup) packed light brown sugar
  • 1/4 tsp table salt
  • 1 1/2 T light corn syrup
  • 1/2 T molasses
  1. Heat the oven to 350°F with a rack in the middle position. Line 4 baking sheets with kitchen parchment.
  2. In a small bowl, stir together the cinnamon, coriander and allspice. Measure 1 teaspoon of the mixture into another small bowl, then whisk the white sugar into it and set aside.
  3. In a medium bowl, whisk together the cake flour, baking soda, cloves and the remaining spice mixture.
  4. In a stand mixer with the paddle attachment, beat the butter, brown sugar and salt on low until combined, about 30 seconds. Increase to medium-high and beat until fluffy and pale, about 5 minutes.
  5. With the mixer running, gradually add the corn syrup, molasses, and 2 tablespoons water.
  6. Using a silicone spatula, scrape the sides of the bowl, then mix for another 30 seconds.
  7. Reduce to low, add the flour mixture and mix until the ingredients just begin to form an evenly moistened dough, about 15 seconds.
  8. Dust the counter liberally with flour and scrape the dough onto it. Gently knead the dough, giving it 2 or 3 turns, until smooth; it should feel moist and supple but should not be sticky.
  9. Divide the dough in half; wrap 1 piece in plastic and set aside. With your hands, pat the second piece into a rough 8-by-6-inch rectangle.
  10. Using a well-floured rolling pin, or between layers of plastic wrap, roll the dough rectangle to an even 1/8-inch thickness. Wrap well and place in the freezer until firm, about 15 minutes. (I place the dough on a plastic cutting board to keep it flat.)
  11. With a 2-inch rectangular or round cookie cutter (ideally with a fluted edge), cut out cookies as close together as possible. Use an offset spatula to carefully transfer the cutouts to one of the prepared pieces of parchment paper, spacing them about 1/2-inch apart. (I used a square cookie cutter.)
  12. Gently pat the dough scraps together, then re-roll and cut out additional cookies; transfer the cutouts to parchment paper.
  13. If desired, use a slightly smaller cutter of the same shape to imprint a decorative border (do not cut all the way through the dough) and use a toothpick to poke a few holes in the centers. (I put 4 holes in the center of each square.)
  14. Sprinkle the cookies evenly with half of the spiced sugar, then freeze or refrigerate uncovered for 15 minutes. (I place the parchment paper on a plastic cutting board to put it in the freezer.)
  15. Repeat the process with the remaining dough.
  16. Place the first sheet of cookies in the oven. Bake until the cookies are firm and beginning to brown, 14 minutes, on convection, or up to 18 minutes in a standard oven, rotating once halfway through.
  17. Cool on the baking sheet for 10 minutes, then use a wide metal spatula to transfer them to a wire rack.
  18. Repeat with the remaining cookies. Cool completely before serving.

Maqlubeh (Palestinian Upside-Down Chicken & Rice)

I have a Maqlubeh (Maqluba) recipe collection. :/ I have always wanted to make this beautiful, multi-layered, flavor-packed dish but was hesitant because it is a bit of a project. This streamlined version inspired me to finally try it. I even made it on a weeknight! (admittedly a little ambitious…)

This recipe was adapted from 177milkstreet.com, contributed by Courtney Hill. I substituted boneless, skinless chicken thighs for bone-in. I also used unsalted butter and chicken stock.

When presenting the finished dish, the platter is gently shaken to create cracks in the rice. The cracks reveal the aromas as well as the chicken and vegetables inside. I absolutely loved it- and drove my family crazy talking about it all evening. 😉 Although it could be served as a complete meal on its own, I served it with roasted asparagus and broccoli as well. It is classically served with a tomato, cucumber and yogurt salad. Fantastic.

Yield: Serves 6 to 8

  • 2 cups white Basmati rice
  • Kosher salt and freshly ground black pepper
  • 1 1/2 pounds boneless, skinless, chicken thighs (about 6) or bone-in, skin-on chicken thighs (about 3), trimmed
  • 4 tablespoons extra-virgin olive oil, divided
  • 1/3 cup raw slivered almonds
  • 8 ounces cauliflower florets, cut into 1-inch pieces
  • 8 to 10 large garlic cloves, minced
  • 4 tablespoons (1/2 stick) unsalted butter, melted
  • 4 teaspoons ground cumin
  • 1 tablespoon ground allspice
  • 2 teaspoons ground turmeric
  • 1 teaspoon freshly grated nutmeg
  • 1/2 to 3/4 medium eggplant (about 8 to 12 ounces), sliced into 1/4-inch-thick rounds
  • 1 quart (4 cups) chicken stock
  1. In a large bowl, combine the rice and 2 tablespoons of coarse salt. Add water to cover by 1 inch, then set aside.
  2. Prepare a lidded pot that measures 9½ to 11 inches in diameter and 4 to 6 inches deep. (I used a large enameled cast iron Dutch oven.) Cut 2 rounds of kitchen parchment the size of the pot. (I cut the rounds slightly oversized so that it had a little bit of a lip.)
  3. Season the chicken all over with salt and pepper.
  4. Set the pot over medium and heat 1 tablespoon of the oil until shimmering.
  5. Add the chicken “skin side” down and cook until browned, about 7 minutes for boneless or 10 minutes for bone-in. Transfer to a plate and set aside.
  6. Remove the pot from heat. Place 1 parchment round on the bottom, then turn to coat it with fat.
  7. Add the remaining 3 tablespoons oil to the parchment-lined pot, then sprinkle evenly with the almonds.
  8. Drain the rice in a fine mesh strainer, then rinse under cool running water and drain again.
  9. Scatter 1 cup of the rice in a thin, even layer over the almonds.
  10. In a medium bowl, mix together the remaining rice with the cauliflower, garlic, melted butter, cumin, allspice, turmeric, nutmeg and 1 3/4 teaspoons each salt and pepper. Reserve 1/2 cup of this mixture, then distribute the remainder in an even layer in the pot.
  11. Place the chicken and accumulated juices (if using boneless, skinless chicken) in the pot, slightly nestling the pieces into the rice-cauliflower layer; discard any accumulated juices (if using bone-in chicken).
  12. Shingle the eggplant slices over the chicken in an even layer. Sprinkle with the reserved 1/2 cup rice-cauliflower mixture.
  13. Pour the stock into the pot (it will not fully cover the eggplant), then bring to a boil over medium-high. Set the second parchment round over the food, the cover the pot with the lid. Cook for 5 minutes, reduce to low and cook, undisturbed, for 35 minutes.
  14. Remove the pot from the heat, uncover and let stand for 15 minutes.
  15. Remove the parchment (and accumulated liquid on the top), then invert a serving platter onto the pot. Holding the platter against the pot, carefully invert the two together; leave the pot overturned on the platter and let rest for about 10 minutes. Slowly lift off the pot and, if needed, remove and discard the parchment.
  16. Gently shake the platter to create cracks in the top of the finished dish.

Browned Butter Crumb Cake Muffins

These New York crumb cake muffins have a few qualities that elevate them a step above others. They not only incorporate lemon zest and browned butter, they also have additional crunchy crumbs hidden inside each muffin. Genius.

The recipe was adapted from The New York Times, contributed by Melissa Clark. I used the zest of an entire lemon and modified the baking time for a convection oven. They were quite large but baked perfectly in a standard muffin tin. Great.

Yield: 12 muffins

For the Topping:

  • 1/2 cup/115 grams unsalted butter (1 stick)
  • 1 1/3 cups/165 grams all-purpose flour
  • 1/2 cup/110 grams dark brown sugar, packed
  • 1 1/2 teaspoons ground cinnamon
  • 1/4 teaspoon ground allspice or cardamom
  • 1/4 teaspoon fine sea salt

For the Batter:

  • 3/4 cup/180 milliliters sour cream
  • 2 large eggs
  • 2 teaspoons vanilla extract
  • 1/4 teaspoon almond extract
  • 1/2 teaspoon finely grated lemon zest (I used the zest of 1 large lemon)
  • 1 1/2 cups/190 grams all-purpose flour
  • 2/3 cup/135 grams granulated sugar
  • 3/4 teaspoon baking soda
  • 3/4 teaspoon baking powder
  • 1/2 teaspoon fine sea salt
  • 1/2 cup/115 grams unsalted butter (1 stick), cut into 1-inch slices and softened
  1. Heat oven to 375 degrees, preferably on convection, and line a 12-cup muffin tin with liners.

Make the Topping:

  1. In a medium saucepan over medium-high heat, melt butter, then let it simmer until the foam on top falls to the bottom of the pot and turns brown, 4 to 6 minutes. It will smell nutty when it’s ready. Immediately pour butter into a small bowl to keep it from getting any browner, and let cool for 5 minutes.
  2. Whisk together flour, sugar, spices and salt in a medium bowl.
  3. Pour in the brown butter and stir, pinching the mixture together, until crumbs form. Set aside.

Make the Batter:

  1. Whisk together sour cream, eggs, vanilla, almond extract and lemon zest in a mixing bowl.
  2. In a large bowl, using a stand mixer fitted with the paddle attachment or a handheld electric mixer, mix together flour, sugar, baking soda, baking powder and salt until combined, about 10 seconds.
  3. Add softened butter and beat for 20 seconds to work it into the flour.
  4. Add egg mixture and continue beating until the batter is very smooth, about 1 minute.
  5. Sprinkle a scant tablespoon of the topping crumbs into the bottom of each muffin liner. (I used a cookie scoop.)
  6. Spoon the batter on top of the crumbs, dividing it evenly. (I used a large cookie scoop- plus a little bit extra- per well.
  7. Bake muffins for 5 minutes to firm up the tops so the crumbs don’t sink into the batter. Remove muffin pan from the oven and lower heat to 350 degrees.
  8. Sprinkle the remaining crumbs on top of each muffin. (I used 1 tablespoon per muffin, rationed with a cookie scoop.)
  9. Continue to bake until the muffins are springy to the touch and a toothpick inserted into the center comes out clean, 17 on convection or up to 30 minutes longer.
  10. Cool on a rack for 15 minutes.
  11. Use an offset spatula or butter knife to lift the muffins out of the pan. Finish cooling muffins on a rack.

Ukrainian Winter Borscht with Vushka

We missed celebrating Christmas with our extended family this year. 😦

Traditionally, my Mother-in-Law makes all of us the meatless 12-dish Ukrainian Christmas Eve feast as part of our celebration. It is a beautiful dinner, but a major undertaking. I didn’t attempt to make the complete meal, but I did make a couple of the courses for our celebration at home. 🙂

Our meal began with a (mini) shot of vodka and a bite-sized piece of challah with honey. We ate this Winter Borscht with Vushka (mushroom-onion dumplings) followed by sauerkraut and potato-cheese pierogies, which my husband purchased from a local Polish store, as our main courses. I made my Mother-in-Law’s apple strudel for dessert, post to follow.

This recipe was adapted from Tom Birchard and Natalie Danford of NYC’s East Village restaurant Veselka, via The New York Times, contributed by Julia Moskin. (I gave my husband the Veselka cookbook for Christmas!) I incorporated some of the beets, puréed, into the finished soup. I used dumplings wrappers instead of making the dough for the dumplings. I also modified the Vushka proportions and technique.

I used beets from my CSA share for the soup, made it in advance and stored it in the freezer. I made the Vushka a day in advance and stored them in the refrigerator. The recipe states that the dumplings are optional; in my house they are essential! The soup had a spicy kick which may have been from the fresh garlic, which is incorporated at the end. I enjoyed it but may consider omitting the garlic next time.

Yield: 6 to 8 servings

For the Borscht:

  • 2 pounds beets, trimmed and scrubbed (do not peel)
  • 3/4 cup white vinegar
  • 1 carrot, peeled and diced
  • 1 stalk celery, diced
  • 1 small onion, diced
  • 4 cups chicken or vegetable stock
  • 2 bay leaves
  • 5 whole allspice berries
  • 1 tablespoon sugar, more to taste
  • 1 garlic clove, minced
  • 1 ½ teaspoons freshly ground black pepper
  • coarse salt
  • mushroom and onion dumplings (Vushka)
  • chopped dill, for garnish, optional
  1. Coarsely chop beets, preferably in a food processor.
  2. In a medium pot, combine beets, 4 cups water and vinegar; bring to a boil. Reduce heat and simmer, uncovered, until beets are soft, about 45 minutes. Strain and set juice aside. (Beets can be used for another purpose, like salad.)(I puréed half of the strained beets in a Vitamix and incorporated them in the finished soup.)
  3. Meanwhile, in a deep pot, combine carrot, celery, onion, stock, bay leaves and allspice; bring to a boil. Reduce heat and simmer, uncovered, 45 minutes. Strain and discard aromatics and vegetables.
  4. Combine strained stock and beet juice and simmer 5 minutes.
  5. Add sugar, garlic (if using), and black pepper. Season to taste with sugar and salt.
  6. Add half of the reserved beets, puréed, into the finished soup, as desired.
  7. Serve with dumplings and sprinkle with dill, as desired.

For the Vushka (Ukrainian Mushroom & Onion Dumplings):

Yield: 80 to 100 dumplings

For the Filling:

  • 2 tablespoons dried porcini mushrooms
  • 1 1/2 tablespoons vegetable oil
  • 1/2 large yellow onion, minced
  • 2 cups chopped button mushrooms
  • coarse salt
  • freshly ground black pepper

For the Dough: (I used Shanghai-style dumpling wrappers instead)

  • 1 large egg yolk
  • 1 tablespoon vegetable oil
  • 3 ¼ cups all-purpose flour, more as needed

To Make the Filling:

  1. Place dried mushrooms in a small bowl and add 2 tablespoons of boiling water. Let soften, about 10 minutes. Strain, reserving liquid and mushrooms separately.
  2. In a large skillet, heat oil over medium heat. Add onion and cook, stirring often, until golden but not brown, about 5 minutes.
  3. Add button mushrooms and cook, stirring, until mushrooms have released their liquid, about 10 minutes. Sprinkle with salt and pepper and drain liquid.
  4. In a food processor, combine both kinds of mushrooms.
  5. Spoon in porcini liquid, leaving behind any silt in bottom of bowl.
  6. Pulse together until finely ground but not pasty: about 3 or 4 pulses. Add salt and pepper to taste and set aside.

To Make the Dough: (I used dumpling wrappers and continued at Step 8)

  1. In a small bowl, combine egg yolk, oil and 1 1/2 cups lukewarm water and whisk 1 minute.
  2. Place flour in a large bowl and make a well in center. Add a third of the egg mixture and lightly mix in with fingers or a fork. Repeat 2 more times.
  3. Using hands, fold dough together until soft: if crumbly, gently work in more water; if sticky, add flour.
  4. Transfer to a lightly floured board and knead 3 minutes.
  5. Form into a ball, transfer to a bowl and refrigerate 45 minutes.
  6. Lightly flour a work surface and a pan or board for the finished dumplings. Divide dough into 3 sections.
  7. Using a well-floured rolling pin, roll each section out until very thin and in a rough rectangle.
  8. Use tip of a sharp knife to cut dough into 1 1/2-inch squares. (I used a 1 1/2-inch square cookie cutter as a guide. Each dumpling wrapper yielded 2 squares. If using square dumpling wrappers, each one may be able to make 4 squares. Next time!)
  9. Cover the cut dough with plastic wrap so that it doesn’t dry out.
  10. Drain any excess liquid from filling. Place 1/4 teaspoon filling in center of each square. (I found it helpful to pre-scoop the filling and place it on a cutting board because it dried it out slightly.)
  11. Wet the edges of the dough and fold squares in half to form triangles, sealing filling inside.
  12. Pinch the 2 opposing corners together to seal tightly, use water if necessary.
  13. Place on a rimmed baking sheet lined with plastic wrap or a floured surface: do not stack.
  14. Repeat with remaining dough and filling.
  15. In a large pot of salted boiling water, cook dumplings until they float, 2 to 4 minutes. (If cooking frozen dumplings, cook until they rise to the surface and add 2 minutes.)
  16. Drain and serve in hot borscht, about 10 per serving, or just with sour cream.

North African Bean Stew with Winter Squash

This is a healthy and hearty vegetarian stew. We ate it over brown Basmati rice with steamed spinach on the side. I loved that it was loaded with warm spices.

The recipe was adapted from Brooklyn’s Kos Kaffe via The New York Times, contributed by Melissa Clark. I used farro instead of barley, used canned beans, and increased the amount of garlic. I also reduced the amount water to achieve a thicker consistency. Nice.

Yield: Serves 8 to 10

For the Baharat Spice Blend:

  • 1 T sweet paprika
  • 1/2 T ground coriander
  • 1/2 T ground cumin
  • 1/2 T ground turmeric
  • 1 tsp freshly ground black pepper
  • 1/2 tsp freshly grated nutmeg
  • 1/2 tsp freshly ground cardamom
  • 1/2 tsp ground allspice

For the Stew:

  • 5 T extra-virgin olive oil, more for serving
  • 2 leeks, white and green parts, diced
  • 1 bunch cilantro, leaves and stems separated
  • 1 cup finely diced fennel, fronds reserved (1 medium or 1/2 large fennel bulb)
  • 4 large garlic cloves, finely chopped
  • 2 1/2 tablespoons baharat spice blend
  • 1 small (or 1/2 large) cinnamon stick
  • 2 tablespoons tomato paste
  • 2 quarts chicken or vegetable stock
  • 1/2 cup pearled barley or farro (I used Trader Joe’s 10 minute farro)
  • 2 1/2 teaspoons kosher salt, more as needed
  •  large pinch saffron, crumbled
  • 4 cups cooked beans or chickpeas (I used 2 15-oz cans of chickpeas, drained and rinsed)
  • 2 cups peeled and diced butternut squash (1/2 large or 1 small squash)
  • 3/4 cup peeled and diced turnip (1 medium)
  • 1/2 cup red lentils
  • plain yogurt, for serving (I used Greek yogurt)
  • aleppo pepper or hot paprika, for serving
  • brown Basmati rice, for serving, optional
  1. Make the baharat spice blend. Set aside.
  2. Cut leeks in half, slice into half moons, and soak in a bowl of water. Drain and finely chop in a food processor.
  3. In a large pot over medium heat, heat oil and cook leeks until they begin to brown, 10 to 12 minutes. (I used a large enameled cast iron Dutch oven.)
  4. While the leeks cook, finely chop the cilantro stems, fennel and garlic in a food processor.
  5. Stir the cilantro stems into the pot, along with diced fennel and garlic. Cook for 2 minutes.
  6. Stir in baharat, cinnamon and tomato paste, and cook until paste begins to caramelize, about 2 minutes.
  7. Stir in broth, 1 cup water (water can be omitted for a thicker consistency), the barley/farro, and the salt. Bring to a gentle boil, stir in saffron, if using, and reduce heat to medium. (The original recipe uses 3 cups of water- increase for a more soup-like consistency, as desired.)
  8. Simmer uncovered for 40 minutes. (I simmered the stew for 20 minutes because I used par-cooked farro.)
  9. Stir in beans, squash, turnip and lentils; cook until barley/farro and vegetables are tender, about another 30 minutes.
  10. Taste and adjust seasonings, if desired. Remove cinnamon stick.
  11. Ladle stew into bowls. (I served it over rice.)
  12. Spoon a dollop of yogurt on top and drizzle with olive oil. Garnish with cilantro leaves, fennel fronds and Aleppo pepper or paprika, as desired.

Rocket Soup (Shorbat Jarjir)

This soup was absolutely heavenly. It was a purée of all of my favorite greens with added silkiness from a single potato. Perfection!

This recipe was adapted from Food and Wine, contributed by Yasmin Khan, author of Zaitoun. I weighed all of the greens, added fresh lemon juice, and increased the garlic. I also incorporated my homemade turkey stock but vegetable stock could be easily substituted to make a vegetarian version. The original recipe recommends the use of spicier, mature arugula. I was upset that I didn’t make a double batch. Next time! 🙂

Yield: 4 servings

  • 2 tablespoons olive oil
  • 1 medium yellow onion, roughly chopped (about 2 cups)
  • 6 garlic cloves, crushed
  • 1 teaspoon ground turmeric
  • 1 teaspoon sea salt
  • 1/2 teaspoon freshly ground black pepper
  • 1/2 teaspoon grated fresh nutmeg
  • 1/4 teaspoon ground allspice
  • 1 medium russet potato, chopped into 1/2-inch dice
  • 4 cups homemade chicken or vegetable stock
  • 7 ounces arugula (I used wild baby arugula)
  • 5 1/4 ounces fresh spinach (I used baby spinach)
  • 1 ounce cilantro sprigs (about 1/2 packed cup)
  • freshly squeezed juice from 1/2 a lemon
  • plain whole-milk Greek yogurt, for serving
  • 2 tablespoons extra-virgin olive oil
  1. Heat the olive oil in a large saucepan over medium. (I used an enameled cast iron pot.)
  2. Add onion and garlic, and cook, stirring often, just until tender, about 5 minutes.
  3. Stir in turmeric, salt, pepper, nutmeg, and allspice; cook, stirring often, 2 minutes.
  4. Add potato and stock, and bring to a simmer. Cook until potato is tender, about 10 minutes.
  5. Reserve a handful of arugula for garnish. Add spinach, cilantro, and remaining arugula to pan. Bring to a simmer over medium, and cook 10 minutes.
  6. Working in batches, transfer soup to a blender. (Alternatively, use an immersion blender to purée the soup.) Secure lid on blender, and remove center piece of lid to allow steam to escape. Place a clean kitchen towel over opening. Process until smooth.
  7. Incorporate the fresh lemon juice.
  8. Taste and adjust seasonings if needed, and divide among 4 bowls.
  9. Top each serving with a generous spoonful of Greek yogurt, some of the reserved arugula, and a drizzle of extra-virgin olive oil.

Enter your email address to follow this blog and receive notifications of new posts by email.

Join 1,464 other subscribers

Recipe Categories

my foodgawker gallery
my photos on tastespotting

Top Posts & Pages

Chez Panisse's Blueberry Cobbler
Fettuccine Alfredo with Chili Crisp & Spinach
Banana Bread with Crunchy Sugar Topping
One-Pan Shrimp Scampi with Orzo
One-Pan Orzo with Spinach & Feta
Mexican Sweet Corn Cake (Pan de Elote)
Peruvian Stir-Fried Chicken & Noodles (Tallarín Saltado)
Ina Garten's Vanilla Bean Brioche Bread Pudding
Ina Garten's Caramelized Onion, Tomato & Goat Cheese Tarts
One-Pot Crispy Gnocchi with Burst Tomatoes & Fresh Mozzarella
Foodista Food Blog of the Day Badge